Apr 4, 2018 | Food, Gallery, Gifts, Tags |
I got to go on the 2016 Stampin’ Up! Incentive Trip, a Mediterranean Cruise. While touring Positano, Italy, famous for their lemons and limoncello, I bought a bag of lemon drops. Wow! They were the best I’ve ever had! They didn’t last long after I got home, so I did an internet search. I found them – you can order them through Amazon.com! They aren’t cheap, and they doesn’t have fast shipping, but oh my, are they worth it! When I decided to give up one of my precious bags of lemon drops for a birthday gift, I knew the Lemon Zest bundle (Lemon Zest stamp set & Lemon Builder Punch) would be perfect. I couldn’t remove the label without destroying the bag, so I opted to cover it. Let me know what you think!
Here’s what I made:


Here’s what I did:
Cut and scored with my Stampin’ Trimmer:
- Lemon Lime Twist card stock (CS) cut to 3″ x 6″, then scored in half at 3″
Stamped with the Lemon Zest stamp set:
- 2 lemons in Daffodil Delight ink onto a scrap of Daffodil Delight CS, then immediately heat embossed them with clear embossing powder, to give them some texture
- leaves in Lemon Lime Twist ink onto a scrap of Lemon Lime Twist CS
- two sentiments – one of the front and one on the back – in Basic Black ink
- NOTE: I used a Black Sharpie marker to add the dots at the ends of the lemons.
Cut using the Lemon Builder Punch:
- lemons and leaves
- stem from a scrap of Lemon Lime Twist CS, which I pressed onto the Lemon Lime Twist ink pad to darken it
Cut using the Envelope Punch Board:
- rounded all four corners of the tag
Assembled the project:
- burnished the fold in the tag with a Bone Folder
- lemons and one leaf glued together, then adhered to the tag front using Stampin’ Dimensionals
- remaining two leaves adhered to the lemons using Stampin’ Dimensionals
- stem glued to tag front, sticking out from under the lemons
- lined up the tag over the original one, and adhered it using Tear & Tape
- Lemon Lime Twist clip added on top for the finishing touch
Here are today’s colors:
You can click on each one to see all the products that come in that color!
Here’s what I used:
Click on these images for more details and to purchase.
Here’s some stuff you should know:
Thanks for stopping by today, and Sweet Stamping!
Feb 24, 2018 | Cards, Food, Gallery |
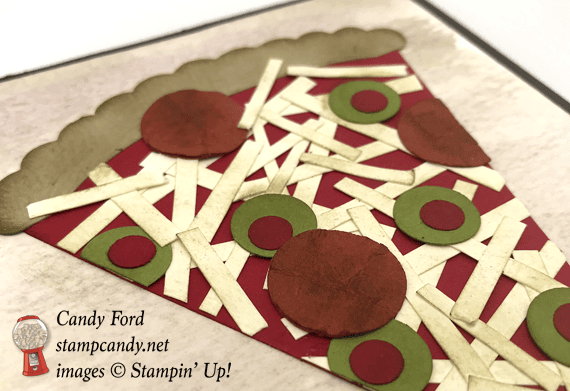
Do you like cheesy dad jokes? No, me neither. But dads sure do like them. That’s why the Dad Jokes stamp set is perfect for guy cards. It’s full of silly dad jokes and images to go with them. For today’s card, I used one of the jokes but decided to make my own slice of pizza instead of using the pizza stamp from the set, because that’s just how I do things sometimes. It has cheese, olives, and pepperoni. I used the Party Hat Builder Framelits Dies for the pizza slice and the crust. Look at this card upside down and you’ll see the party hat. The only item not from Stampin’ Up! I used is a 1/4″ circle punch. We all probably have at least one of those lying around, don’t we?

Dad Jokes Stamp Set © Stampin’ Up!
Here’s what I made:


Here’s what I did:
Cut and scored with my Stampin’ Trimmer:
- Early Espresso card stock (CS) cut to 11″ x 4-1/4″, then scored in half at 5-1/2″
- Watercolor Paper cut to 4″ x 5-1/4″
- Very Vanilla CS cut to 4″ x 5-1/4″ for the inside of the card
- Very Vanilla CS cut to 1/8″ strips of various lengths, about 3/4″ – 1-1/4″
Stamped with the Dad Jokes stamp set:
- sentiments in Early Espresso ink onto the Very Vanilla CS
Die cut using the Party Hat Builder Framelits:
- pizza base from Real Red CS
- pizza crust from Crumb Cake CS
Colored using an Aqua Painter:
- Watercolor Paper in Early Espresso ink
Punched using Circle Punches :
- Cajun Craze CS using the 3/4″ punch
- Old Olive CS using the 1/2″ punch
- Real Red CS using a 1/4″ punch
Colored using a Sponge Dauber:
- assembled pizza slice, crinkled up pepperoni, cheese using Early Espresso ink (see below)
Assembled the card:
- burnished the fold in the card base with a Bone Folder
- watercolor paper (thoroughly dried) glued onto the front of the card base
- Crumb Cake pizza crust glued onto the Real Red pizza slice
- Very Vanilla CS strips glued onto the pizza slice
- real Red 1/4″ circles glued onto the 1/2″ Old Olive CS circles, then glued onto the pizza
- Cajun Craze circles crinkled up in your hand, then laid out flat and sponged (see above)
- edges of crust and toppings “toasted” using a Sponge Dauber and Early Espresso ink
- pizza slice glued onto the Watercolor Paper
- Very Vanilla CS with sentiments glued onto the inside of the card base
Here are today’s colors:
You can click on each one to see all the products that come in that color!
Here’s what I used:
Click on these images for more details and to purchase.
Here’s some stuff you should know:
- This is a fabulous time to join my team! Sale-A-Bration is the biggest event of the Stampin’ Up! year and you can save big on the ultimate bundle, the Starter Kit. CLICK HERE for more information. Contact me with any questions: email candy@stampcandy.net or call/text 404-661-5222
- Newsletter: subscribe for exclusive deals, projects, and more! Enter your email address and click SUBSCRIBE at the top right of this page, just under the picture of my smiling face. You can also choose to receive an email every day that I have a blog post.
- Check out My Events Calendar HERE
- Host Code for the month of February (2T9AQTKG) Find out more about HOW, WHEN and WHY to use the code HERE.
- My Thank You Gift to You in February: Narrow Note Cards & Envelopes – Find out more HERE.
- Gift Certificates are available in any U.S. dollar amount from me. Contact me – email: candy@stampcandy.net OR call/text: 404-661-5222
- Gumball Rewards for all orders over $50. Find out more HERE.
Thanks for stopping by today, and Sweet Stamping!

Feb 8, 2018 | Blog Hop, Boxes, Cards, Food, Gallery, Gift Wrap, Gifts, Guest Stamper, Occasions, Sale-A-Bration |

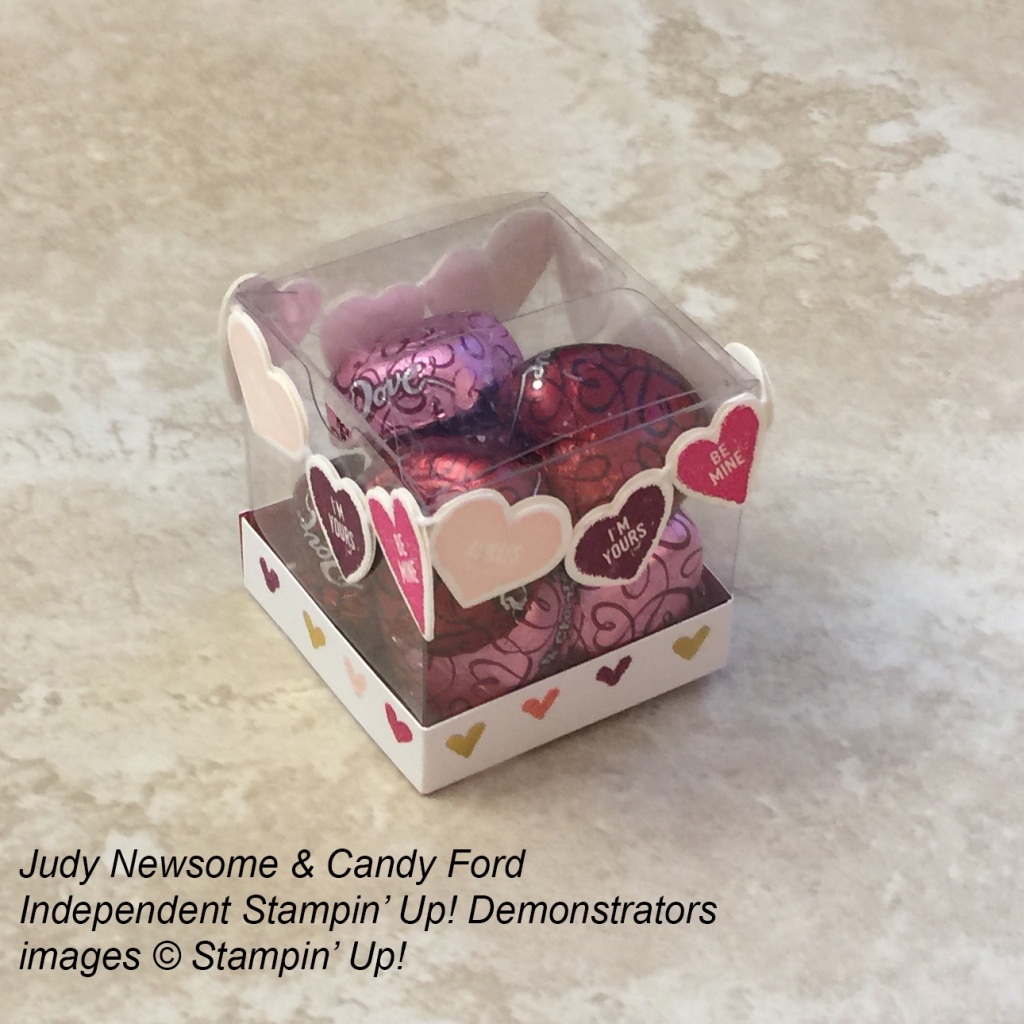
It’s time for the OSAT Blog Hop! This month’s theme is Don’t go breaking my heart in honor of Valentine’s Day. Remember the song by Elton John and Kiki Dee? If not, you can watch the video here. My project has plenty of hearts – a large one from the Painted with Love Designer Series Paper, and small ones from the Sure Do Love You stamp set – and fortunately none of them are broken.
I’m on a ship right now (I’m actually at a live performance by Casey McPherson as I type this, so if there are any typos, that’s why!) My sister, and Candy Hearts team member, Judy Newsome, is house sitting. When I realized I’d forgotten to make the projects for today before I left, I contacted her and begged for help. Of course, she obliged because that’s the kind of gal she is. Between the two of us, we designed the card and treat box, and she actually made and photographed them. So while it was a team effort, she did the lion’s share of the work. Thanks, Judy!
Be sure to hop around to all the blogs listed below. You don’t want to miss any of the great projects by this group!
Here’s what we made:


Here’s what she did:
Cut and scored with my Stampin’ Trimmer:
- Rich Razzleberry card stock (CS) cut to 4-1/4″ x 11″, then scored in half at 5-1/2″
- Melon Mambo CS cut to 4-1/8″ x 5-3/8″
- Powder Pink CS cut to 4″ x 5-1/4″
- Painted With Love Designer Series Paper (DSP) cut to 3-7/” x 5-2/8″ (small hearts design)
- Melon Mambo CS cut to 3-1/2″ x 3/4″
- Powder Pink CS cut to 3-1/2″ x 5/8″
- Painted With Love DSP cut to 1/2″ x 8-1/2″ (one row of small hearts) then scored at 2″, 4″, 6″, and 8″
- Whisper White CS cut to 4″ x 5-1/4″ for the inside of the card
Stamped with the Sure Do Love You stamp set:
- small conversation hearts in Powder Pink,Melon Mambo, and Rich Razzleberry inks onto scraps of of Whisper White CS (4 of each)
Stamped with the Cozy Cottage stamp set:
- card sentiment in Melon Mambo ink onto the Powder Spink CS strip
Die cut using the Lots of Love Box Framelits:
- small converstaion hearts
- large heart from a scrap of the DSP (striped design)
Cut using Paper Snips:
- notched one end of the Melon Mambo and Powder Pink CS strips
- NOTE: you could use the Banner Triple Punch instead
Assembled the card:
- burnished the fold in the card base with a Bone Folder
- Melon Mambo CS layer glued onto the front of the card base
- Powder Pink CS layer glued onto the Melon Mambo CS layer
- DSP layer glued onto the Powder Pink CS layer
- sentiment glued onto the Melon Mambo CS strip
- Melon Mambo CS strip glued onto the DSP layer
- large DSP heart adhered to the DSP layer using Stampin’ Dimensionals
- Whisper White CS glued to the inside of the card base
Assembled the treat box:
- popped the premade box together (just fold in the bottom flaps!)
- glued the conversation hearts to a piece of Whisper White Solid Baker’s Twine to make the garland
- adhered garland around the top of the box with Mini Glue Dots
- adhered strip of DSP around the bottom of the box with Fast Fuse
- filled the box with Dove Milk & Dark Chocolate Hearts
Here’s the hop:
Be sure to hop to all the blogs to see the terrific projects made by this amazing team of stampers. Use the list below if you get lost.
Here are today’s main colors:
You can click on each one to see all the products that come in that color!
Here’s what we used:
Click on these images for more details and to purchase.
Here’s some stuff you should know:
- This is an AMAZING time to join the Candy Hearts! Sale-A-Bration is the biggest event of the Stampin’ Up! year and you can save big on the ultimate bundle, the Starter Kit. CLICK HERE for more information. Contact me with any questions: email candy@stampcandy.net or call/text 404-661-5222
- Newsletter: subscribe for exclusive deals, projects, and more! Enter your email address and click SUBSCRIBE at the top right of this page, just under the picture of my smiling face. You can also choose to receive an email every day that I have a blog post.
- Check out My Events Calendar HERE
- Host Code for the month of February (2T9AQTKG) Find out more about HOW, WHEN and WHY to use the code HERE.
- My Thank You Gift to You in February: Narrow Note Cards & Envelopes – Find out more HERE.
- Gift Certificates are available in any U.S. dollar amount from me. Contact me – email: candy@stampcandy.net OR call/text: 404-661-5222
- Gumball Rewards for all orders over $50. Find out more HERE.
Thanks for stopping by today, and Sweet Stamping!

Feb 5, 2018 | Boxes, Food, Gallery, Gift Wrap, Gifts |
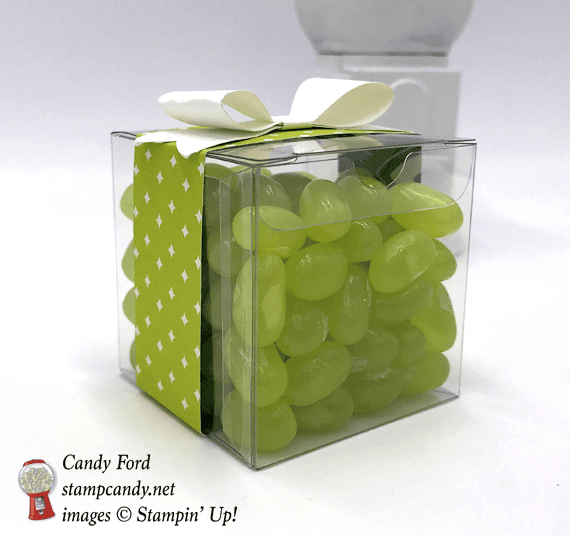
Today’s project is so quick and easy it really doesn’t need instructions, but since I know some folks will ask if I don’t explain how it’s done, I will. This little treat is a lemon lime dream. Lemon Lime Twist paper (from the Eastern Palace Designer Series Paper) and actual lemon lime jelly beans match perfectly. And you know how I like stuff to match!
You can whip up a bunch of these little treats, in any color you choose, in no time. The box goes together in seconds. Wouldn’t they be darling on a table, maybe one box on each place setting? Or if you need a bunch of cute little somethings in a hurry for a gathering, your child’s classmates, coworkers, you name it! Just think of all the possibilities!
FYI, a little square Pandora charm box fits inside this treat box perfectly. I’m thinking a ring box would as well.
Here’s what I made:


Here’s what I did:
Cut and scored with my Stampin’ Trimmer:
- Eastern Palace Specialty Designer Series Paper (DSP) cut to 1″ x 9″, then scored at 2″, 4″, 6″, and 8″
Cut using the Bow Builder Punch:
- a scrap of Whisper White card stock
- NOTE: cut twice to have enough pieces for one bow. There will be one small piece left over.
Assembled the project:
- assembled a Clear Tiny Treat Box
- NOTE: when folding in the bottom flaps, you’ll see there’s one flap with 2 sticky-outy pieces, one flap with 1 sticky-outy piece, and the 2 side pieces. Fold them in this order: 1) 2 flap, 2) side flaps, 3) one flap, tucking it’s tongue into the slot created by the other flaps.
- put the jelly beans inside
- wrapped the DSP around the box and glued the ends together on the bottom
- assembled the bow using glue
- NOTE: you may notice the fold lines in the bow. I didn’t burnish, or curl, the paper with a Bone Folder before assembling the pieces. Oops! Burnish them, the way you’d curl ribbon, and you won’t have that problem.
- glued the bow onto the top of the band of DSP
Here are today’s colors:
You can click on each one to see all the products that come in that color!
Here’s what I used:
Click on these images for more details and to purchase.
Here’s some stuff you should know:
- This is a fabulous time to join my team! Sale-A-Bration is the biggest event of the Stampin’ Up! year and you can save big on the ultimate bundle, the Starter Kit. CLICK HERE for more information. Contact me with any questions: email candy@stampcandy.net or call/text 404-661-5222
- Newsletter: subscribe for exclusive deals, projects, and more! Enter your email address and click SUBSCRIBE at the top right of this page, just under the picture of my smiling face. You can also choose to receive an email every day that I have a blog post.
- Check out My Events Calendar HERE
- Host Code for the month of February (2T9AQTKG) Find out more about HOW, WHEN and WHY to use the code HERE.
- My Thank You Gift to You in February: Narrow Note Cards & Envelopes – Find out more HERE.
- Gift Certificates are available in any U.S. dollar amount from me. Contact me – email: candy@stampcandy.net OR call/text: 404-661-5222
- Gumball Rewards for all orders over $50. Find out more HERE.
Thanks for stopping by today, and Sweet Stamping!

Dec 30, 2017 | Boxes, Christmas, Food, Gallery, Gift Wrap, Gifts, Holiday |
These mini coffee cups, or espresso cups, are great for tiny gifts. They’re easy to decorate and fill. Today I’m sharing two different batches of these that I made. One batch of Christmas themed cups contains Starbucks Holiday Blend coffee k-cups. The other batch of coffee themed cups contain coffee flavored candies.
Here’s what I made:


Here’s what I did:
Made cup cover and belly band:
- rolled a cup on a large piece of scrap paper, following it with a pencil
- cut out the template with Paper Snips and wrapped it around a cup to make sure it fit
- held the template on the cup with my fingers and drew a belly band onto the template with a pencil
- used that to create a template for the belly band
- covers and cut using Paper Snips from Coffee Break, Be Merry, and Merry Music Specialty Designer Series Papers (DSP)
- belly bands cut using Paper Snips from DSP and from CS in Pool Party, Whisper White, Garden Green, and Cherry Cobbler
Stamped with the Hug in a Mug stamp set:
- sentiment onto Whisper White card stock (CS) in Pear Pizzazz, Early Espresso, Garden Green, and Cherry Cobbler inks
Stamped with the Merry Cafe stamp set:
- sentiment in Memento Tuxedo Black ink onto Whisper White CS
- snowflake in Cherry Cobbler ink above the sentiment
Die cut using the Layering Circles Framelits:
- all sentiments
- larger circles to layer with sentiment, from Pool Party, Early Espresso, Garden Green, and Cherry Cobbler CS
Assembled the cups:
- covers glued onto the cups
- belly bands glued onto the covers
- sentiments layered with coordinating larger circles, then adhered to the cup lids with Stampin’ Dimensionals (The center part of the lid is lower than the rim.)
- adhered a small Rhinestone Basic Jewel to the center of the stamped snowflakes
NOTE: The cups, lids, k-cups, and candies were all ordered from Amazon.com.
Here are today’s colors:
You can click on each one to see all the products that come in that color!
Here’s what I used:
Click on the images for more details and to purchase.
Here’s some stuff you should know:
- Swatch Books and Product Shares from the 2018 Occasions and Sale-A-Bration Catalogs – order yours by January 2 HERE.
- Newsletter: subscribe for exclusive deals, projects, and more! Enter your email address and click SUBSCRIBE at the top right of this page, just under the picture of my smiling face.
- Gift Certificates are available in any U.S. dollar amount from me. Contact me – email: candy@stampcandy.net OR call/text: 404-661-5222
- Year End Sales Event ends January 2, 2018 – CLICK HERE for details. Order soon so you don’t miss your favorite retiring items!
- This is a great time to join my team! With the demonstrator discount of at least 20%, you can get Christmas gifts for all the stampers on your list! Plus you can order from the 2018 Occasions and Sale-A-Bration catalogs now! CLICK HERE for more information. Contact me with any questions: email candy@stampcandy.net or call/text 404-661-5222
- Sale-a-bration Stamp Fest coming January 20. Details and register HERE
- Check out My Events Calendar HERE
- Stampin’ Blends alcohol markers are now available! Click HERE for more info.
- Host Code for the month of December (HS67FXTS) Find out more about HOW, WHEN and WHY to use the code HERE.
- December’s FREE gift: Year of Cheer Specialty Washi Tape – Find out more HERE.
- Gumball Rewards for all orders over $50. Find out more HERE.
Thanks for stopping by today, and Sweet Stamping!

Dec 29, 2017 | Boxes, Christmas, Food, Gallery, Gift Wrap, Gifts, Holiday, New Year, Retiring Products |
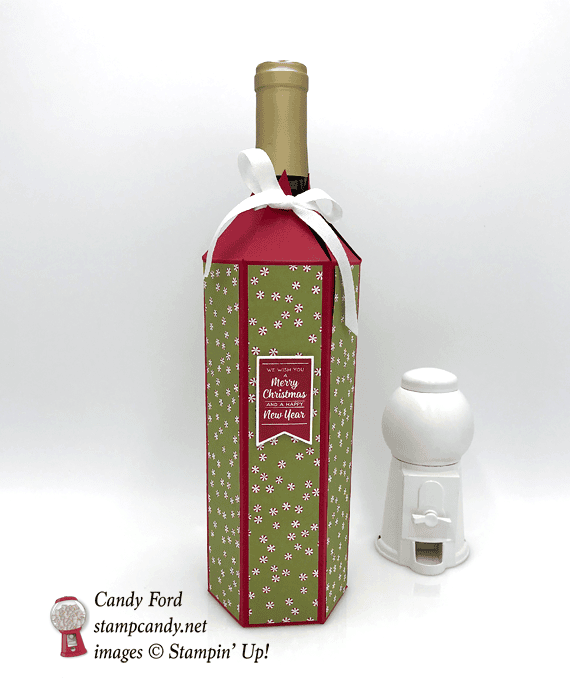
I guess I’m a little late posting this one, but you can always change the colors and the sentiment for any occasion, or save it for next year. The Christmas Around the World Designer Series Paper has so many different patterns, even some that can be used for non-Christmas projects. I used the design with lots of tiny mints for today’s project. And the sentiment is made using the Brightly Lit Christmas Bundle. Both the paper and the bundle are retiring. They’ll be available only until January 2, or while supplies last.

Christmas Around the World DSP © Stampin’ Up!

Brightly Lit Christmas Bundle © Stampin’ Up!
Here’s what I made:


Here’s what I did:
Cut and scored with my Stampin’ Trimmer:
- Real Red card stock (CS) cut to 11″ x 12
- CS scored along the 11″ side at 1-3/4″, 3-1/2″, 5-1/4″, 7″, 8-3/4″, 10-1/2″
- CS scored along the 12″ side at 2″ and 10″
- Christmas Around the World Designer Series Paper (DSP) cut to 1-1/2″ x 7-3/4″ (6 pieces)
Cut CS using Paper Snips, according to the diagram:
- removed two smallest rectangles, and angled the leftover tab (in blue)
- cut vertical score lines along the bottom just up to the first horizontal score line
- marked along the top side at 7/8″, 2-5/8″, 4-3/8″, 6-1/8″, 7-7/8″, and 9-5/8″
- cut from marks to the intersections of the vertical score lines and the first horizontal score line – this cuts away the green areas
- used a 1/4″ circle punch to cut a hole in each triangle, about 1/2″ or so from the top – you may want to use a smaller circle punch, like the 1/8″, depending on the size of your ribbon

Stamped with the Brightly Lit Christmas stamp set:
- sentiment in Real Red ink onto a scrap of Whisper White card stock (CS)
Die cut using the Christmas Lamppost Thinlits:
Assembled the bottle cover:
- all score lines burnished with a Bone Folder
- DSP pieces glued onto the panels of the CS cover
- sentiment adhered to one of the DSP pieces with Stampin’ Dimensionals
- skinny tab on one side of the bottle cover adhered to the inside of the other end of the cover with Fast Fuse
- bottle inserted into the cover to make the next step easier:
- folded in one of the bottom tabs, then glued the opposite tab to it, making sure the tabs lined up with each other
- repeated this step for the remaining two pairs of tabs, gluing them all together
- ran a 22″ piece of ribbon through each hole in the top triangles, always front to back, then pulled it tight (not too hard or you’ll tear the paper) and tied a bow
Here are today’s colors:
You can click on each one to see all the products that come in that color!
Here’s what I used:
Click on the images for more details and to purchase.
Here’s some stuff you should know:
- Swatch Books and Product Shares from the 2018 Occasions and Sale-A-Bration Catalogs – order yours by January 2 HERE.
- Newsletter: subscribe for exclusive deals, projects, and more! Enter your email address and click SUBSCRIBE at the top right of this page, just under the picture of my smiling face.
- Gift Certificates are available in any U.S. dollar amount from me. Contact me – email: candy@stampcandy.net OR call/text: 404-661-5222
- Year End Sales Event ends January 2, 2018 – CLICK HERE for details. Order soon so you don’t miss your favorite retiring items!
- This is a great time to join my team! With the demonstrator discount of at least 20%, you can get Christmas gifts for all the stampers on your list! Plus you can order from the 2018 Occasions and Sale-A-Bration catalogs now! CLICK HERE for more information. Contact me with any questions: email candy@stampcandy.net or call/text 404-661-5222
- Sale-a-bration Stamp Fest coming January 20. Details and register HERE
- Check out My Events Calendar HERE
- Stampin’ Blends alcohol markers are now available! Click HERE for more info.
- Host Code for the month of December (HS67FXTS) Find out more about HOW, WHEN and WHY to use the code HERE.
- December’s FREE gift: Year of Cheer Specialty Washi Tape – Find out more HERE.
- Gumball Rewards for all orders over $50. Find out more HERE.
Thanks for stopping by today, and Sweet Stamping!


