Sep 22, 2020 | Boxes, Christmas, Food, Gallery, Gift Wrap, Gifts, Holiday |
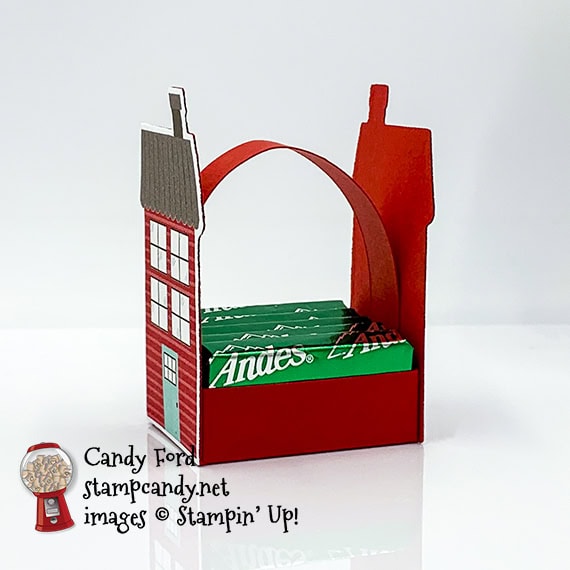
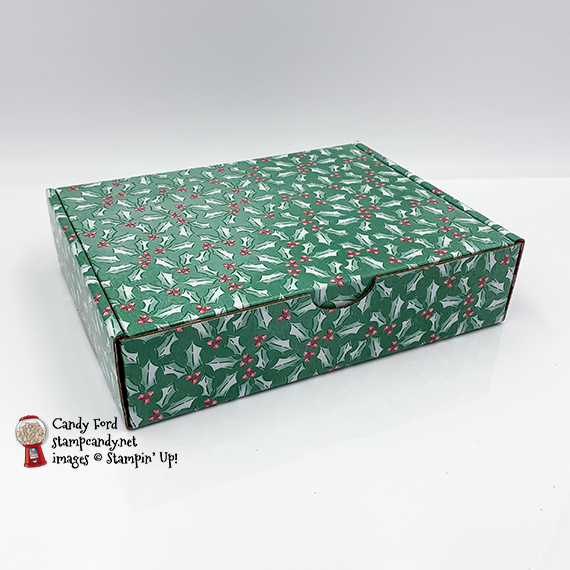
Today I’m sharing a Treat Holder that holds 5 Andes Mints. This is one of the projects we made this weekend at our Candy Hearts team meeting. I was inspired by the little treat holders on page 26 of the August – December 2020 Mini Catalog.
If you are reading this in email, some photos may appear blurry, or may not appear at all. Please click here to see the post on my blog.
S Treat Holder Treat Holder Treat Holder Treat Holder
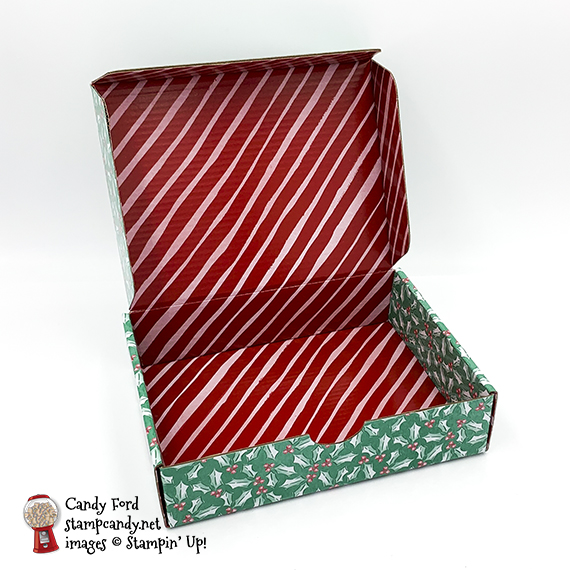
Here’s what I made:

Wink of Stella can add so much to a project, but it seems almost impossible to photograph. Here are a couple of feeble attempts at getting it to show in a photo. It’s much more visible in person, but without being too glitzy.

S
Here’s what I did:
Cut and scored with my paper trimmer:
- Poppy Parade card stock (CS) cut to 2-5/8″ x 2-1/4″, then scored 1/2″ from all four sides
- strip of Poppy Parade CS cut to 1/2″ x 5″ (feel free to make this longer if you wish)
Cut using Paper Snips:
- one score line at each corner, to create a flap at each corner
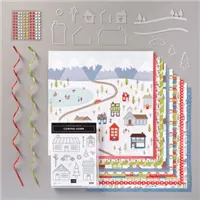
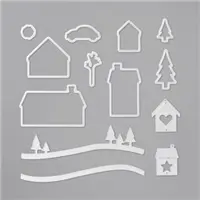
Cut using the Home Together Dies:
- 2 houses from a scrap of Trimming the Town Designer Series Paper (DSP)
- 2 houses from a scrap of Poppy Parade CS
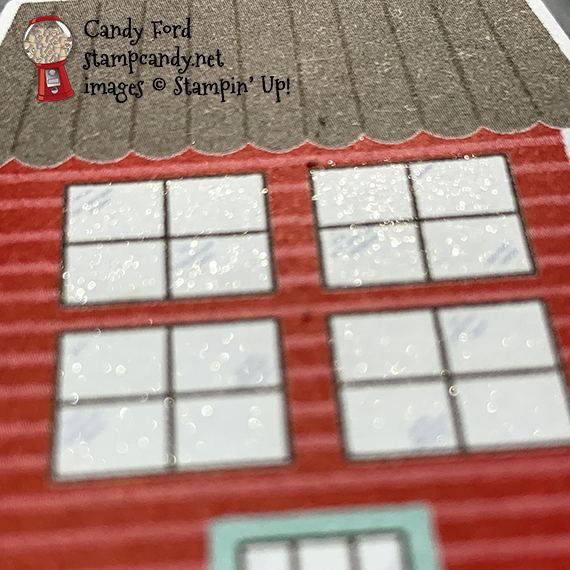
Colored using Clear Wink of Stella:
- windows of both DSP houses (allow to dry thoroughly before handling)
Assembled the treat holder:
- burnished the folds in the base with a Bone Folder
- corner flaps glued onto the inside of the adjacent sides, to form the open top box
- ran a Bone Folder along the 1/2″ strip, like you would do to curl ribbon, to soften the fibers (This is so it will curve and not bend.)
- one end of the strip glued to the inside of one of the shorter sides of the box
- opposite end of the strip glued to the inside of the opposite short side of the box
- each die cut DSP house glued onto a die cut Poppy Parade CS house
- one house glued onto the outside of each end of the box, only putting along the bottom where it meets the side of the box and a little up the center where it meets the handle
- This will hold 5 Andes Mints perfectly.
S
Here are today’s colors:
You can click on each one to see all the products that come in that color!
S
Here’s what I used:
Click on these images for more details and to purchase. If you are reading this post in email, the product images may not show up. Please click here to see the post on my blog.
Supply List. <— Click for a clickable and printable list of the products!
S
Two ways to save in September!
Buy the Starter Kit and receive even more! It’s already the best deal: $99 for $125 in product of your choice plus Free shipping! In September you will also receive the Queen Anne’s Lace stamp set, the So Much Love stamp set, Rhinestone Basic Jewels, and 16 precut card kits! Wow! This is the perfect time to work on your wish list of Stampin’ Up! products! CLICK HERE for more details.

Buy the new Stampin’ Cut & Emboss Machine (standard size) from me by September 30 and I will give you a Magnetic Cutting Plate FREE! You’ll save almost $30! CLICK HERE for more details and to order.

S
Mystery Stamping Party!

Go ahead and click the image above to join the Facebook group now. A few days before the party I will post what you will need to complete the mystery card. On September 23 at 8:00pm ET, I will begin posting clues you can follow to create the card. We’ll also have games and prizes! And it’s all FREE!
S
World Card Making Day 2020:

- Join me for an afternoon of Bingo, cardmaking, prizes, and fun!
- October 3 at 2:00 pm ET
- See details and register HERE by September 25
- $25 (extra Bingo cards available for $5 each)
- Tell your friends! The more people who register, the bigger the prizes!
S
Here are some helpful links:
S
Thanks for stopping by today, and Sweet Stamping!

Sep 18, 2020 | Autumn, Boxes, Gallery, Gifts |
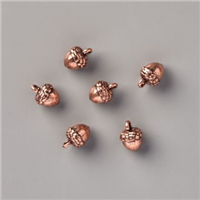
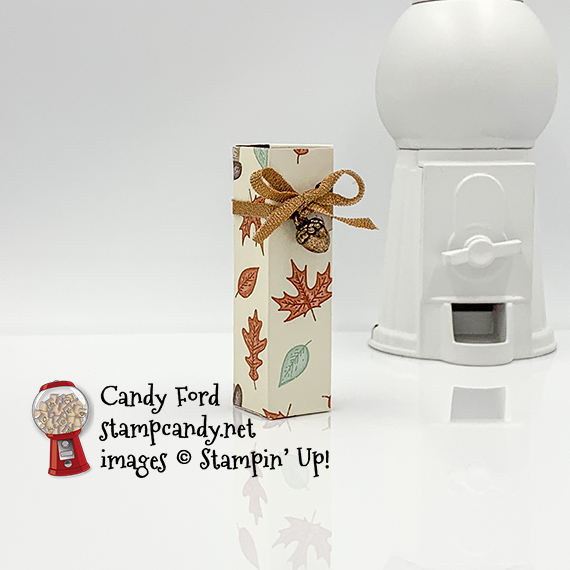
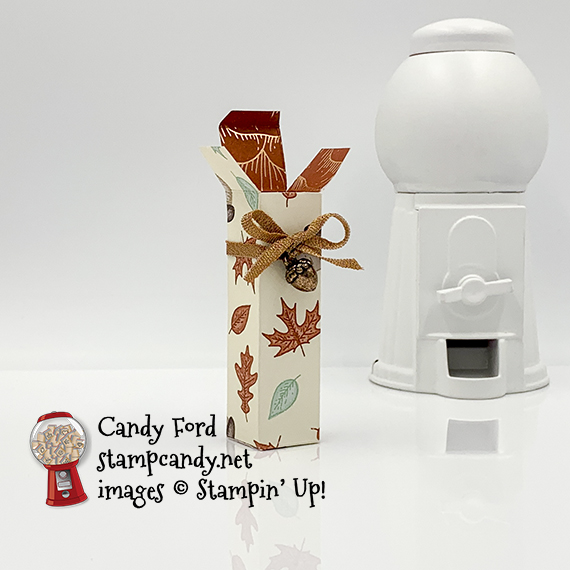
Today I’m sharing a lip balm holder I made with Gilded Autumn Designer Series Paper. I also used the Copper Trim and Acorn Trinkets from the Gilded Autumn Suite Collection. This holder fits any standard size lip balm, like Burt’s Bees, ChapStick, etc. The finished dimensions of the closed holder are 3/4″ x 3/4″ x 2-3/4″. I gave you a sneak peek of it a few days ago, in the post about the coordinating card. You can see that post here.
If you are reading this in email, some photos may appear blurry, or may not appear at all. Please click here to see the post on my blog.
S Gilded Gilded Gilded Gilded
Here’s what I made:

S
Here’s what I did:
Cut and scored with my paper trimmer:
- Gilded Autumn Designer Series Paper (DSP) layer cut to 3-1/4″ x 4-1/2″, and scored and cut according to the diagram
- cut solid lines, score dotted lines, and remove green areas
-
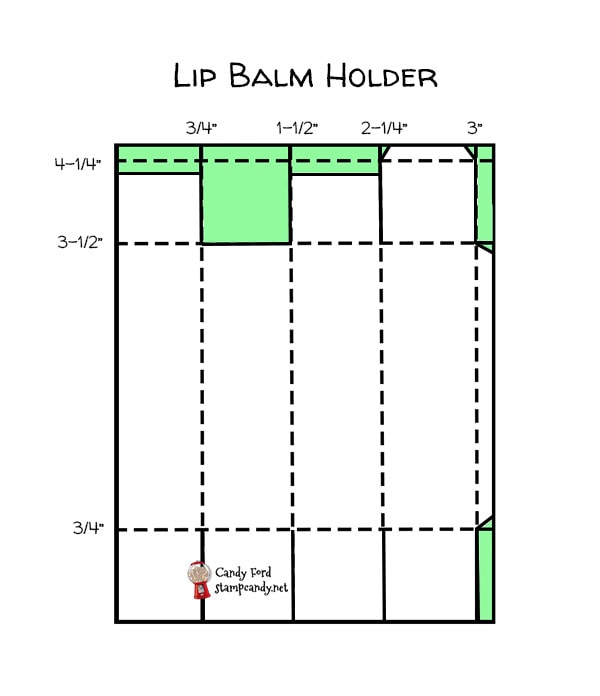 click the diagram to view larger
Assembled the holder:
- burnished all the folds in the DSP with a Bone Folder
- long 1/4″ tab on the side glued onto the inside of the the opposite side to form the box
- bottom flaps folded in and glued together to form the bottom
- lip balm dropped into the box
- side flaps closed and lid closed and tab tucked in
- 2″ length of Tear & Tape folded in half, so it’s only 1/8″ wide x 2″ long, then applied onto the back and two sides of the box
- NOTE: I used the pointy end of my Take Your Pick tool to open the Tear & Tape back up after folding it over onto itself.
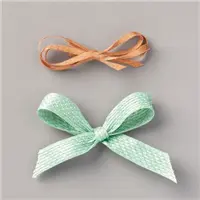
- center of ribbon adhered on the back of the box and wrapped around the two sides, covering the Tear & Tape
- acorn trinket threaded onto the ribbon, then the ribbon tied in a bow
- glue dot applied behind the bow, using a Take Your Pick tool, to hold it in place
S
Here are today’s colors:
You can click on each one to see all the products that come in that color!
S
Here’s what I used:
Click on these images for more details and to purchase. If you are reading this post in email, the product images may not show up. Please click here to see the post on my blog.
Supply List. <— Click for a clickable and printable list of the products!
Two ways to save in September!
Buy the Starter Kit and receive even more! It’s already the best deal: $99 for $125 in product of your choice plus Free shipping! In September you will also receive the Queen Anne’s Lace stamp set, the So Much Love stamp set, Rhinestone Basic Jewels, and 16 precut card kits! Wow! This is the perfect time to work on your wish list of Stampin’ Up! products! CLICK HERE for more details.
Buy the new Stampin’ Cut & Emboss Machine (standard size) from me by September 30 and I will give you a Magnetic Cutting Plate FREE! You’ll save almost $30! CLICK HERE for more details and to order.
S
Mystery Stamping Party!
Go ahead and click the image above to join the Facebook group now. A few days before the party I will post what you will need to complete the mystery card. On September 23 at 8:00pm ET, I will begin posting clues you can follow to create the card. We’ll also have games and prizes! And it’s all FREE!
S
World Card Making Day 2020:
- Join me for an afternoon of Bingo, cardmaking, prizes, and fun!
- October 3 at 2:00 pm ET
- See details and register HERE by September 25
- $25 (extra Bingo cards available for $5 each)
- Tell your friends! The more people who register, the bigger the prizes!
S
Here are some helpful links:
S
Thanks for stopping by today, and Sweet Stamping!
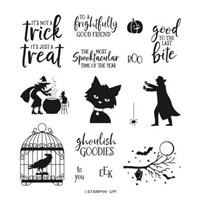
Sep 16, 2020 | Autumn, Bags, Blog Hop, Food, Gallery, Gift Wrap, Gifts, Halloween, Holiday, Tags |

Welcome to the September 2020 Inking Royalty Blog Hop! During this year’s blog hops, we are enjoying a year of celebrations. This month’s projects are all about Halloween. I used the Ghoulish Goodies stamp set, Essential Tag Punch, and Fancy Label Punch to create tags for this cute and scary little treat bag. The candies inside are Bloody Bones Sweet Tarts Candy. Ooooooo spooky! You can buy them here.
Prepare yourself for a wonderful mix of spooky, scary and sweet. We are excited to share our creations with you today! After you read my post, I hope you’ll hop over to the next person, Ann Murray at Murray Stamps Ink, on the list you can see when you scroll down. Be sure to hop around to ALL the stops, because you definitely want to see all the projects this group has created for you!
If you are reading this in email, some photos may appear blurry, or may not appear at all. Please click here to see the post on my blog.
S september 2020 inking royalty september 2020 inking royalty september 2020 inking royalty september 2020 inking royalty
Here’s what I made:

S
Here’s what I did:
Stamped with the Ghoulish Goodies stamp set:
- raven in cage in Memento Tuxedo Black ink onto a scrap of Whisper White Thick CS
- sentiment in Memento Tuxedo Black ink onto a scrap of Real Red CS
Cut using the Essential Tag Punch:
- stamped image and sentiment
Cut using the Label Me Fancy Punch:
- a hole in the top of each tag
- NOTE: I found it a little difficult to line up the punch exactly where I wanted it, so I drew a tiny dot on the tags where I wanted to punch, then positioned each tag so I could see the dot through the hole in the punch. Easy Peasy!

Put it all together:
- put candies in a Mpsaic Gusseted Cellophane Bag and tied the top with a piece of Black Glittered Organdy Ribbon
- black and white twine run through the 2 tags and tied around the top of the bag, tying a small bow in the back
- For the photo, I glued the tags together so you could see both at the same time. You can leave them loose if you prefer.

S
Here’s the September 2020 Inking Royalty Blog Hop:
Thank you for hopping along with us. If you get stuck during the Blog Hop, please use this line-up as a guide:
- Brian King at Stamp with Brian
- Candy Ford at Stamp Candy <— YOU ARE HERE!
- Ann Murray at Murray Stamps Ink
- Sue Jackson at Just Peachy Stamping
- Jackie Beers at Blue Line Stamping
- Rachel Brumley at Artistic Designs by Rachel
- Sheryl Sharp at Sharp Notes by Sheryl
- Shawn de Oliveira at Shawn Stamps
- Julie DiMatteo at The Paper Pixie
- Pam Morris at Tap Tap Stamp
- Lynn Kolcun at Avery’s Owlery
- Sheryl Abernathy at Elegant Sentiments
- Linda Krueger at The Stamp Coach
- Joanne Brown at The Inky Dragon
S
Here are today’s colors:
You can click on each one to see all the products that come in that color!
My husband and I have a Halloween party every year, and this year’s theme was going to be “What’s black and white and red all over?” Unfortunately we had to cancel it this year. But I just realized as I was typing this post that those are the colors of my project today. I’m sure that fact was floating around in the back of my brain somewhere as I made the tags.
S
Here’s what I used:
Click on these images for more details and to purchase. If you are reading this post in email, the product images may not show up. Please click here to see the post on my blog.
Supply List. <— Click for a clickable and printable list of the products!
S
Two ways to save in September!
Buy the Starter Kit and receive even more! It’s already the best deal: $99 for $125 in product of your choice plus Free shipping! In September you will also receive the Queen Anne’s Lace stamp set, the So Much Love stamp set, Rhinestone Basic Jewels, and 16 precut card kits! Wow! This is the perfect time to work on your wish list of Stampin’ Up! products! CLICK HERE for more details.
Buy the new Stampin’ Cut & Emboss Machine (standard size) from me by September 30 and I will give you a Magnetic Cutting Plate FREE! You’ll save almost $30! CLICK HERE for more details and to order.
S
Mystery Stamping Party!
Go ahead and click the image above to join the Facebook group now. A few days before the party I will post what you will need to complete the mystery card. On September 23 at 8:00pm ET, I will begin posting clues you can follow to create the card. We’ll also have games and prizes! And it’s all FREE!
S
World Card Making Day 2020:
- Join me for an afternoon of Bingo, cardmaking, prizes, and fun!
- October 3 at 2:00 pm ET
- See details and register HERE by September 25
- $25 (extra Bingo cards available for $5 each)
- Tell your friends! The more people who register, the bigger the prizes!
S
Here are some helpful links:
S
Thanks for stopping by today, and Sweet Stamping!
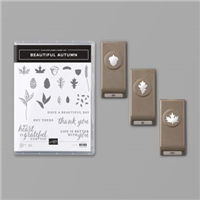
Sep 15, 2020 | Autumn, Boxes, Cards, Fun Folds, Gallery, Gift Wrap, Gifts |
Autumn is almost here, and today’s project is a thank you card that’s all about the season. I used the Beautiful Autumn stamp set and Stitched So Sweetly Dies to create this simple fun fold card. I also made a coordinating little lip balm gift box, which I’ll share with you in a few days (you can see a sneak peek of it below.)
If you are reading this in email, some photos may appear blurry, or may not appear at all. Please click here to see the post on my blog.
S Autumn Autumn Autumn Autumn
Here’s what I made:


S
Here’s what I did:
Cut and scored with my paper trimmer:
- Early Espresso card stock (CS) cut to 5-1/2″ x 8-1/2″, then scored in half at 4-1/4″ and at 7-1/2″
- Gilded Autumn Designer Series Paper (DSP) layer cut to 3″ x 5-1/4″ (speckled)
- speckled DSP layer cut to 1″ x 5-1/4″
- herringbone pattern DSP layer cut to 5-1/4″ tall by 4 pattern stripes wide (just over 3/4″)
- acorn/leaf pattern DSP layer cut to 2-1/2″ x 4-1/4″
- Very Vanilla CS cut to 4″ x 5-1/4″ for the inside of the card base
Stamped with the Beautiful Autumn stamp set:
- sentiment in Versamark ink onto a scrap of Early Espresso CS, then heat embossed in gold
- acorn in Early Espresso ink onto the bottom left corner of the Very Vanilla CS
Cut using the Stitched So Sweetly Dies:
Assembled the card:
- burnished the folds in the card base with a Bone Folder, folding the 1″ section back onto the card front
- larger speckled DSP layer glued onto the front of the card base (left side and under the folded over flap)
- acorn/leaf DSP layer glued onto the speckled DSP layer
- herringbone DSP layer glued onto the flap of the card base
- flap glued down onto the DSP layers
- sentiment glued onto the flap and DSP layers, but not the small part hanging off the right side
- 1″ speckled DSP strip glued onto the right side of the Very Vanilla CS
- Very Vanilla CS glued onto the inside of the card base
- If you prefer, you can skip gluing down the flap, and then only glue the sentiment to the flap, leaving the rest loose. I just felt the card would be easier to photograph if I glued them down.
S
Here are today’s main colors:
You can click on each one to see all the products that come in that color!
S
Here’s what I used:
Click on these images for more details and to purchase. If you are reading this post in email, the product images may not show up. Please click here to see the post on my blog.
Supply List. <— Click for a clickable and printable list of the products!
S
Two ways to save in September!
Buy the Starter Kit and receive even more! It’s already the best deal: $99 for $125 in product of your choice plus Free shipping! In September you will also receive the Queen Anne’s Lace stamp set, the So Much Love stamp set, Rhinestone Basic Jewels, and 16 precut card kits! Wow! This is the perfect time to work on your wish list of Stampin’ Up! products! CLICK HERE for more details.
Buy the new Stampin’ Cut & Emboss Machine (standard size) from me by September 30 and I will give you a Magnetic Cutting Plate FREE! You’ll save almost $30! CLICK HERE for more details and to order.
S
Here are some helpful links:
S
Thanks for stopping by today, and Sweet Stamping!
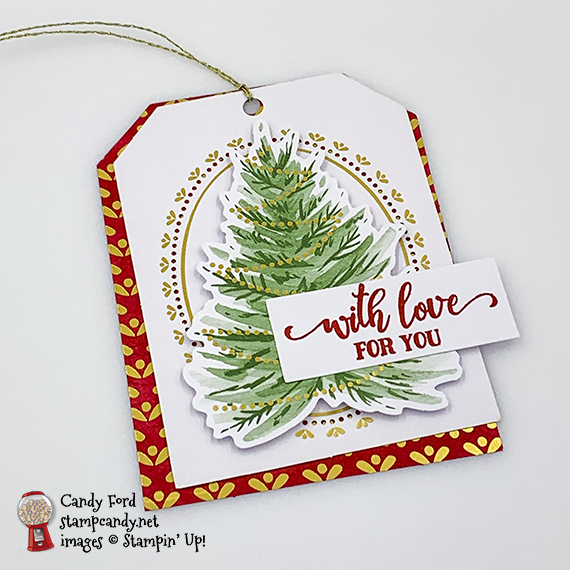
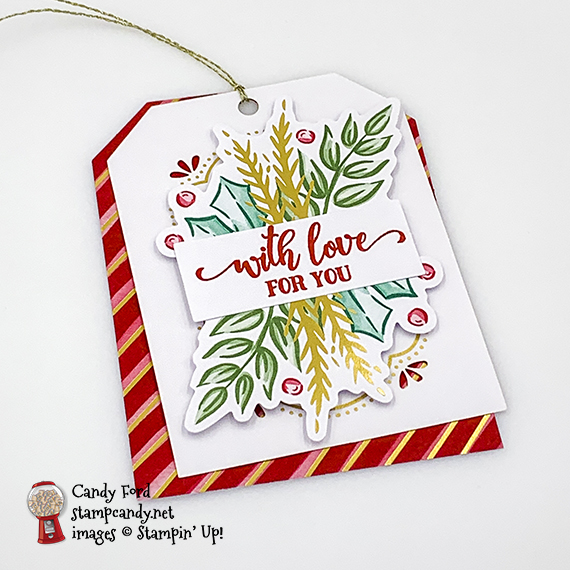
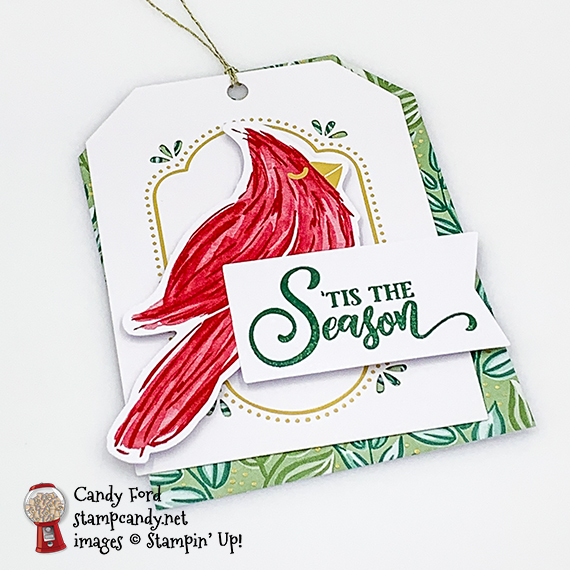
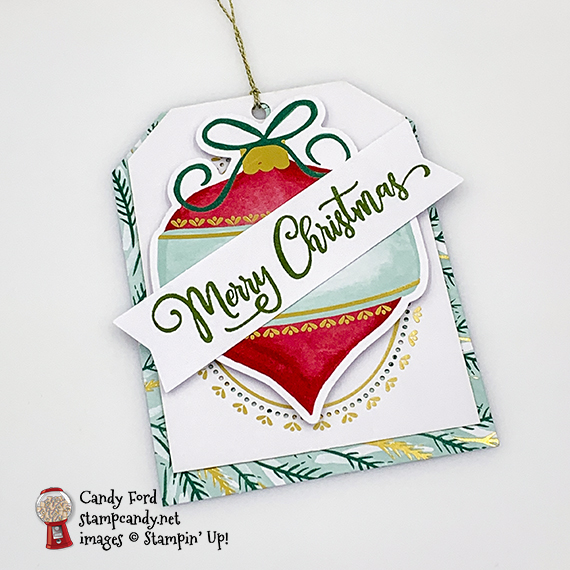
Aug 11, 2020 | Christmas, Gallery, Gifts, Holiday, Kits, New Products, Tags |
Today I’m sharing the Tag Buffet Project Kit. It makes 30 large tags. Each one is 3-1/4″ x 4-1/4″, and they also make great additions to card fronts. I don’t think any photos do these tags justice. They have gold accents, and delicate laser-cut features. Everything is pre-die cut. All you have to do is stamp the sentiments and layer the pieces together.
If you are reading this in email, some photos may appear blurry, or may not appear at all. Please click here to see the post on my blog.
S tag buffet tag buffet tag buffet tag buffet
Here are the Tag Buffet Kit and Stamp Set:
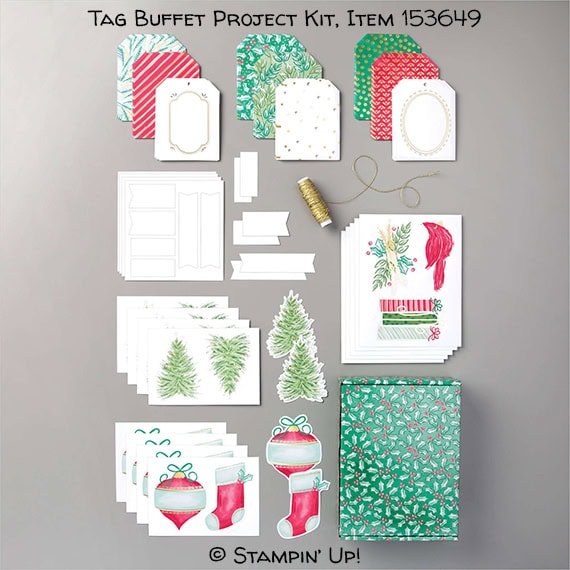
Tag Buffet Stamp Set, Item # 153612
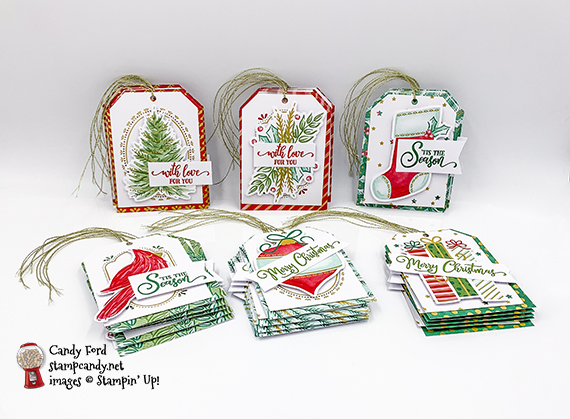
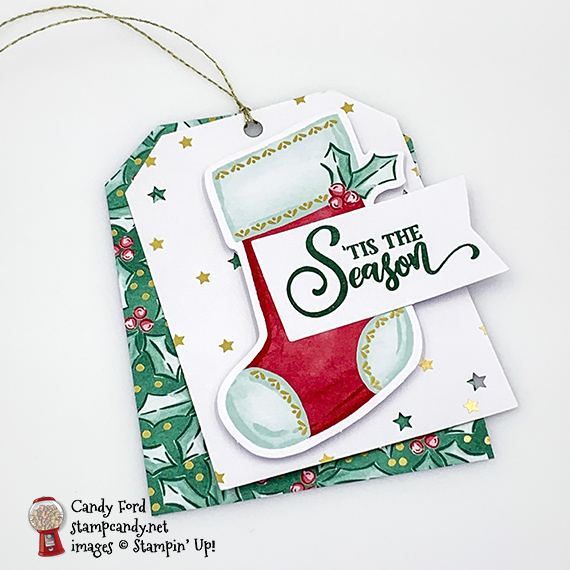
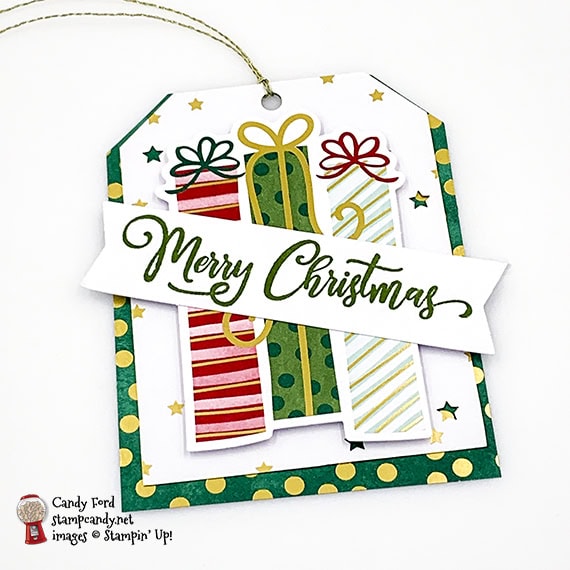
Here’s what I made:
And look at this great box it comes in!
This would make a great gift!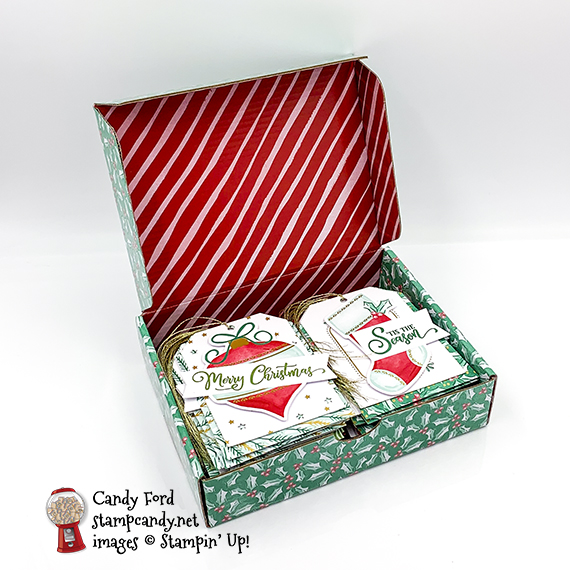
S
Here’s what I did:
Stamped with the Tag Buffet stamp set:
- sentiments in Garden Green, Real Red, and Shaded Spruce inks onto the included labels
Assembled the tags:
- sentiments glued onto the die cut images
- die cut images adhered onto the top tags using Stampin’ Dimensionals
- top and bottom tags tied together with the included gold twine
- That’s it!oS
S
Here are the kit’s colors:
You can click on each one to see all the products that come in that color!
S
Here’s what I used:
Click on these images for more details and to purchase. If you are reading this post in email, the product images may not show up. Please click here to see the post on my blog.
Supply List. <— Click for a clickable and printable list of the products!
S
The new catalog AND the new online store are live!
Click the image to check it out now!
S
Use your Bonus Days coupons by August 31!
Click the image below to shop now and use your Bonus Days coupons!

S
Here are some helpful links:
S
Thanks for stopping by today, and Sweet Stamping!
Apr 2, 2020 | Gallery, Gifts, Tags |
Today’s project is a tag I made for the gifts I brought back from Mexico for my Candy Hearts team members. I used the Tropical Oasis Designer Series Paper and the Tropical Oasis Trinkets along with the Scalloped Tag Topper Punch.
Every year, my husband and I join a few other couples for a midwinter tropical vacation. All the husbands met while speaking on a software conference series called No Fluff Just Stuff. They call themselves the Fluff Talkers, and the spouses call ourselves the Fluff Widows. This was the 11th year the couples have vacationed together on what we call the “Pasty Geeks” trip. This year we went to Mexico. It’s a great place to get vanilla, so that’s what we brought back as souvenirs.
If you are reading this in email and the photos are blurry, or don’t show up at all, Click Here to read this post on my blog. Thanks!
S oasis oasis oasis
Here’s what I made:
The bottles came with the gingham fabric toppers and red elastic bands.

S
Here’s what I did:
Cut and scored with my paper trimmer:
- Real Red card stock (CS) cut to 2″ x 3-1/2″
- Tropical Oasis Designer Series Paper (DSP) layer cut to 1-3/4″ x 2-1/2″
- Whisper White CS layer cut to 1-3/4″ x 2-1/2″
Cut using the Scallop Tag Topper Punch:
- one end of the Real Red CS
Assembled the tag:
- Whisper White CS glued onto one side of the tag
- DSP glued onto the other side of the tag
- trinket adhered onto the DSP using Mini Glue Dots
- tag tied onto the bottle’s red elastic band using Linen Thread
- NOTE: I folded the thread in half, pushed the loop end through the hole in the tag, ran the two ends through the loop, and pulled taut. Then I tied a knot in the two pieces of thread about 1/4″ or so above the tag. This leaves a bit of the thread for the tag to dangle when it’s tied to the bottle, instead of the tag being tied up against the bottle.

S
Here are today’s main colors:
You can click on each one to see all the products that come in that color!
S
Here’s what I used:
Click on these images for more details and to purchase. If you are reading this in email and the photos don’t show up, Click Here to read this post on my blog.
Click “Supply List” for a clickable and printable list of the products!
S
Here are some helpful links:
Thanks for stopping by today, and Sweet Stamping!