Feb 22, 2018 | Cards, Gallery, Sale-A-Bration |
The Blossoming Basket Bundle (Blossoming Basket stamp set and Basket Weave Dynamic embossing folder) is one of the new Sale-A-Bration items. You can get it FREE with a $100 order! I used it to make today’s card. Let me know what you think.
You may notice a few changes in the look of this web site. I’m in the process of changing it up a little, just to give it a fresher look. There are more changes coming, so keep an eye out. Please let me know what you think about any or all of the changes. This site is for you, after all.
Here’s what I made:


Here’s what I did:
Cut and scored with my Stampin’ Trimmer:
- Cherry Cobbler card stock (CS) cut to 5-1/2″ x 8-1/2″, then scored in half at 4-1/4″
- Gold Foil sheet cut to 5-1/4″ x 4″
- Whisper White CS cut to 4″ x 3-1/2″
- Whisper White CS cut to 5-1/4″ x 4″ for the inside of the card
Stamped with the Blossoming Basket stamp set:
- basket image in black Memento ink onto the smaller Whisper White CS layer
- tag on the basket handle
- sentiment in black Memento ink onto a scrap of Whisper White CS
Embossed using the Basket Weave Dynamic embossing folder:
Cut using Paper Snips:
- around the sentiment
- a scrap of Cherry Cobbler CS a little bigger than the sentiment
- NOTE: I didn’t measure these. I just cut until it looked right. The white strip is about 1/2″ tall, and the red one is about 3/4″ tall.
Colored using Stampin’ Blends Markers:
- flower petals and tag hearts in Cherry Cobbler
- flower centers in Daffodil Delight with specks of Pumpkin Pie
- leaves in Old Olive
- basket in Crumb Cake
Assembled the card:
- burnished the fold in the card base with a Bone Folder
- embossed gold layer adhered to the front of the card base using Fast Fuse
- basket layer adhered to the embossed gold layer using Fast Fuse
- sentiment glued onto the Cherry Cobbler CS strip
- Cherry Cobbler CS strip adhered to the card front using Fast Fuse
- a gold enamel heart applied to the sentiment strip
- 5-1/4″ x 4″ Whisper White CS glued to the inside of the card base
Here are today’s colors:
You can click on each one to see all the products that come in that color!
Here’s what I used:
Click on these images for more details and to purchase.
Here’s some stuff you should know:
- This is a fabulous time to join my team! Sale-A-Bration is the biggest event of the Stampin’ Up! year and you can save big on the ultimate bundle, the Starter Kit. CLICK HERE for more information. Contact me with any questions: email candy@stampcandy.net or call/text 404-661-5222
- Newsletter: subscribe for exclusive deals, projects, and more! Enter your email address and click SUBSCRIBE at the top right of this page, just under the picture of my smiling face. You can also choose to receive an email every day that I have a blog post.
- Check out My Events Calendar HERE
- Host Code for the month of February (2T9AQTKG) Find out more about HOW, WHEN and WHY to use the code HERE.
- My Thank You Gift to You in February: Narrow Note Cards & Envelopes – Find out more HERE.
- Gift Certificates are available in any U.S. dollar amount from me. Contact me – email: candy@stampcandy.net OR call/text: 404-661-5222
- Gumball Rewards for all orders over $50. Find out more HERE.
Thanks for stopping by today, and Sweet Stamping!

Feb 8, 2018 | Blog Hop, Boxes, Cards, Food, Gallery, Gift Wrap, Gifts, Guest Stamper, Occasions, Sale-A-Bration |

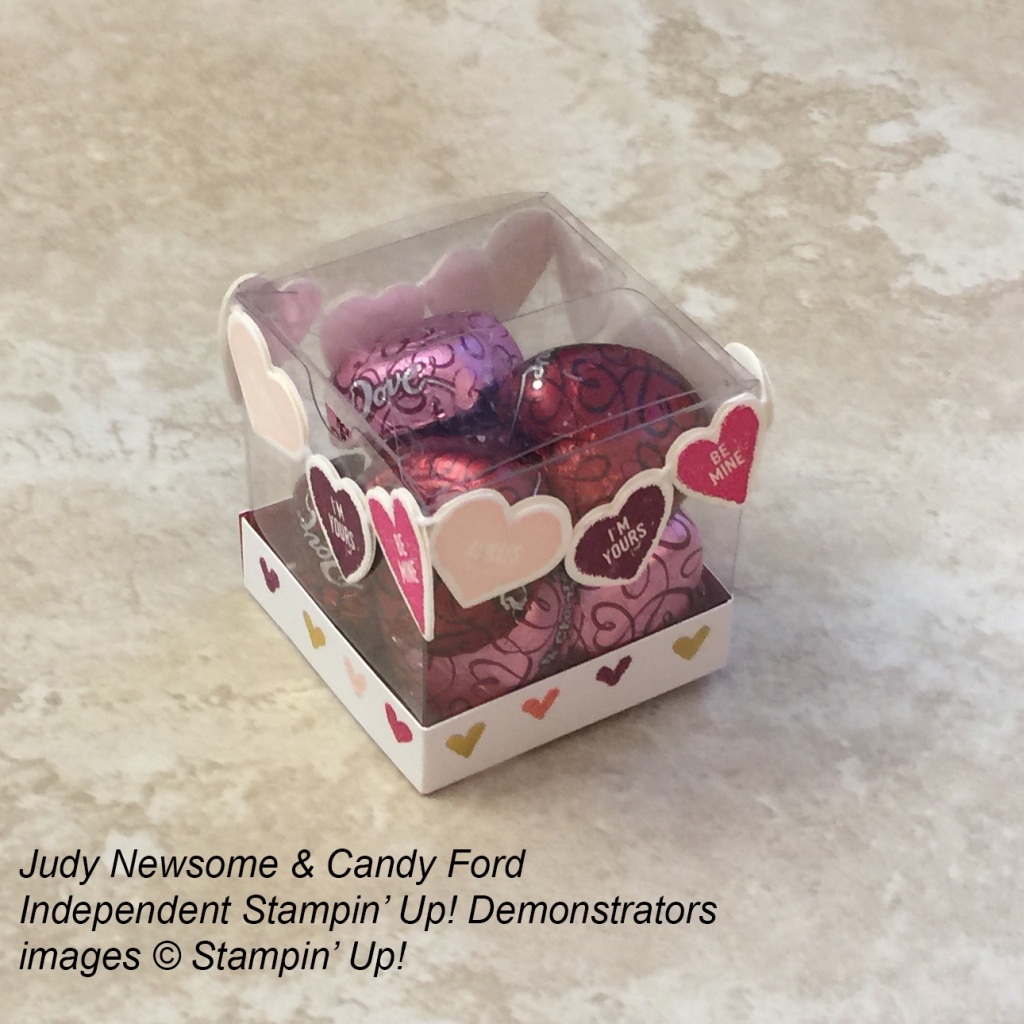
It’s time for the OSAT Blog Hop! This month’s theme is Don’t go breaking my heart in honor of Valentine’s Day. Remember the song by Elton John and Kiki Dee? If not, you can watch the video here. My project has plenty of hearts – a large one from the Painted with Love Designer Series Paper, and small ones from the Sure Do Love You stamp set – and fortunately none of them are broken.
I’m on a ship right now (I’m actually at a live performance by Casey McPherson as I type this, so if there are any typos, that’s why!) My sister, and Candy Hearts team member, Judy Newsome, is house sitting. When I realized I’d forgotten to make the projects for today before I left, I contacted her and begged for help. Of course, she obliged because that’s the kind of gal she is. Between the two of us, we designed the card and treat box, and she actually made and photographed them. So while it was a team effort, she did the lion’s share of the work. Thanks, Judy!
Be sure to hop around to all the blogs listed below. You don’t want to miss any of the great projects by this group!
Here’s what we made:

Here’s what she did:
Cut and scored with my Stampin’ Trimmer:
- Rich Razzleberry card stock (CS) cut to 4-1/4″ x 11″, then scored in half at 5-1/2″
- Melon Mambo CS cut to 4-1/8″ x 5-3/8″
- Powder Pink CS cut to 4″ x 5-1/4″
- Painted With Love Designer Series Paper (DSP) cut to 3-7/” x 5-2/8″ (small hearts design)
- Melon Mambo CS cut to 3-1/2″ x 3/4″
- Powder Pink CS cut to 3-1/2″ x 5/8″
- Painted With Love DSP cut to 1/2″ x 8-1/2″ (one row of small hearts) then scored at 2″, 4″, 6″, and 8″
- Whisper White CS cut to 4″ x 5-1/4″ for the inside of the card
Stamped with the Sure Do Love You stamp set:
- small conversation hearts in Powder Pink,Melon Mambo, and Rich Razzleberry inks onto scraps of of Whisper White CS (4 of each)
Stamped with the Cozy Cottage stamp set:
- card sentiment in Melon Mambo ink onto the Powder Spink CS strip
Die cut using the Lots of Love Box Framelits:
- small converstaion hearts
- large heart from a scrap of the DSP (striped design)
Cut using Paper Snips:
- notched one end of the Melon Mambo and Powder Pink CS strips
- NOTE: you could use the Banner Triple Punch instead
Assembled the card:
- burnished the fold in the card base with a Bone Folder
- Melon Mambo CS layer glued onto the front of the card base
- Powder Pink CS layer glued onto the Melon Mambo CS layer
- DSP layer glued onto the Powder Pink CS layer
- sentiment glued onto the Melon Mambo CS strip
- Melon Mambo CS strip glued onto the DSP layer
- large DSP heart adhered to the DSP layer using Stampin’ Dimensionals
- Whisper White CS glued to the inside of the card base
Assembled the treat box:
- popped the premade box together (just fold in the bottom flaps!)
- glued the conversation hearts to a piece of Whisper White Solid Baker’s Twine to make the garland
- adhered garland around the top of the box with Mini Glue Dots
- adhered strip of DSP around the bottom of the box with Fast Fuse
- filled the box with Dove Milk & Dark Chocolate Hearts
Here’s the hop:
Be sure to hop to all the blogs to see the terrific projects made by this amazing team of stampers. Use the list below if you get lost.
Here are today’s main colors:
You can click on each one to see all the products that come in that color!
Here’s what we used:
Click on these images for more details and to purchase.
Here’s some stuff you should know:
- This is an AMAZING time to join the Candy Hearts! Sale-A-Bration is the biggest event of the Stampin’ Up! year and you can save big on the ultimate bundle, the Starter Kit. CLICK HERE for more information. Contact me with any questions: email candy@stampcandy.net or call/text 404-661-5222
- Newsletter: subscribe for exclusive deals, projects, and more! Enter your email address and click SUBSCRIBE at the top right of this page, just under the picture of my smiling face. You can also choose to receive an email every day that I have a blog post.
- Check out My Events Calendar HERE
- Host Code for the month of February (2T9AQTKG) Find out more about HOW, WHEN and WHY to use the code HERE.
- My Thank You Gift to You in February: Narrow Note Cards & Envelopes – Find out more HERE.
- Gift Certificates are available in any U.S. dollar amount from me. Contact me – email: candy@stampcandy.net OR call/text: 404-661-5222
- Gumball Rewards for all orders over $50. Find out more HERE.
Thanks for stopping by today, and Sweet Stamping!
Feb 7, 2018 | Blog Hop, Cards, Challenges, Gallery, Sale-A-Bration, Techniques |

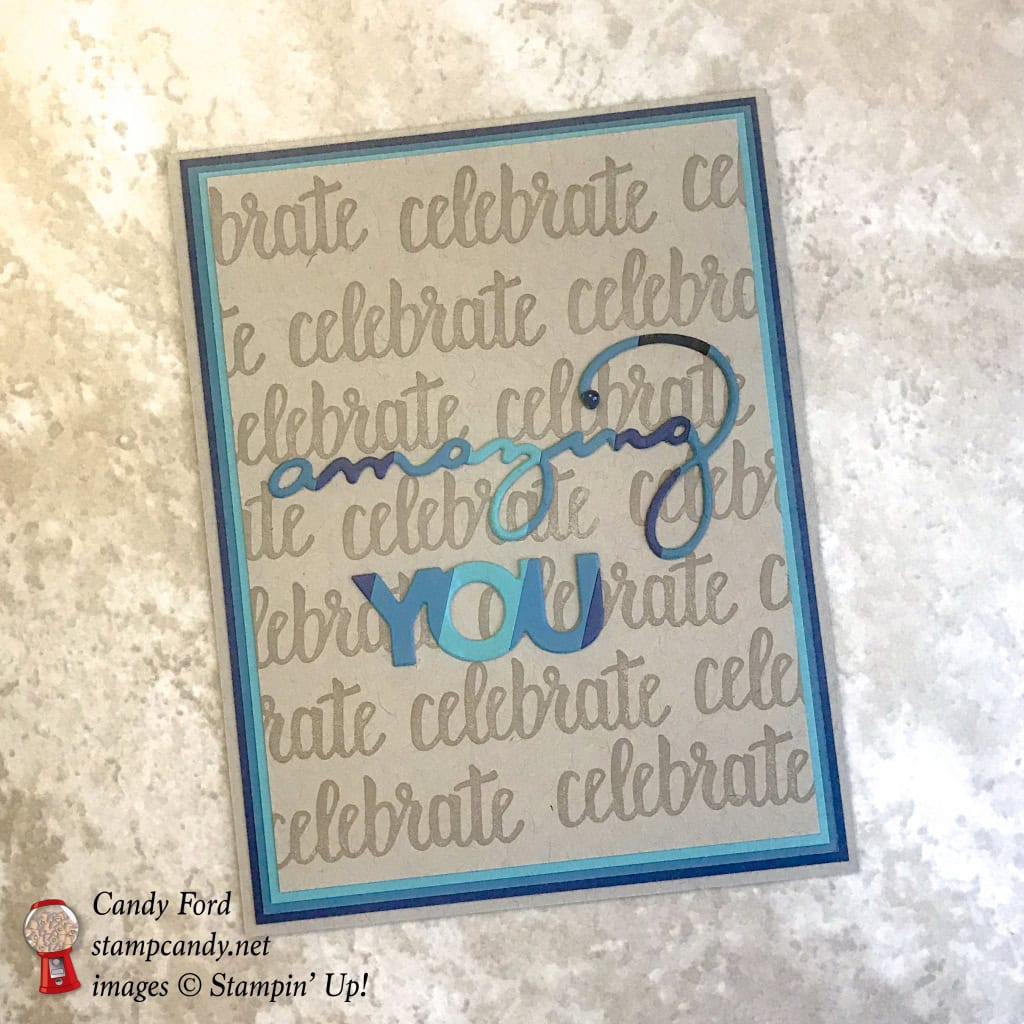
The Sale-A-Bration continues…with a color challenge! This month’s ICS Blog Hop is all about Sale-A-Bration, plus we’re using specific colors. We could use any of these five colors: Crumb Cake, Bermuda Bay, Dapper Denim, Night of Navy, and Island Indigo for our projects. I used all but one (Dapper Denim.) I used the Amazing You stamp set and the coordinating Celebrate You Thinlits Dies – both are available for FREE with a qualifying order during Sale-A-Bration (only through March 31!)

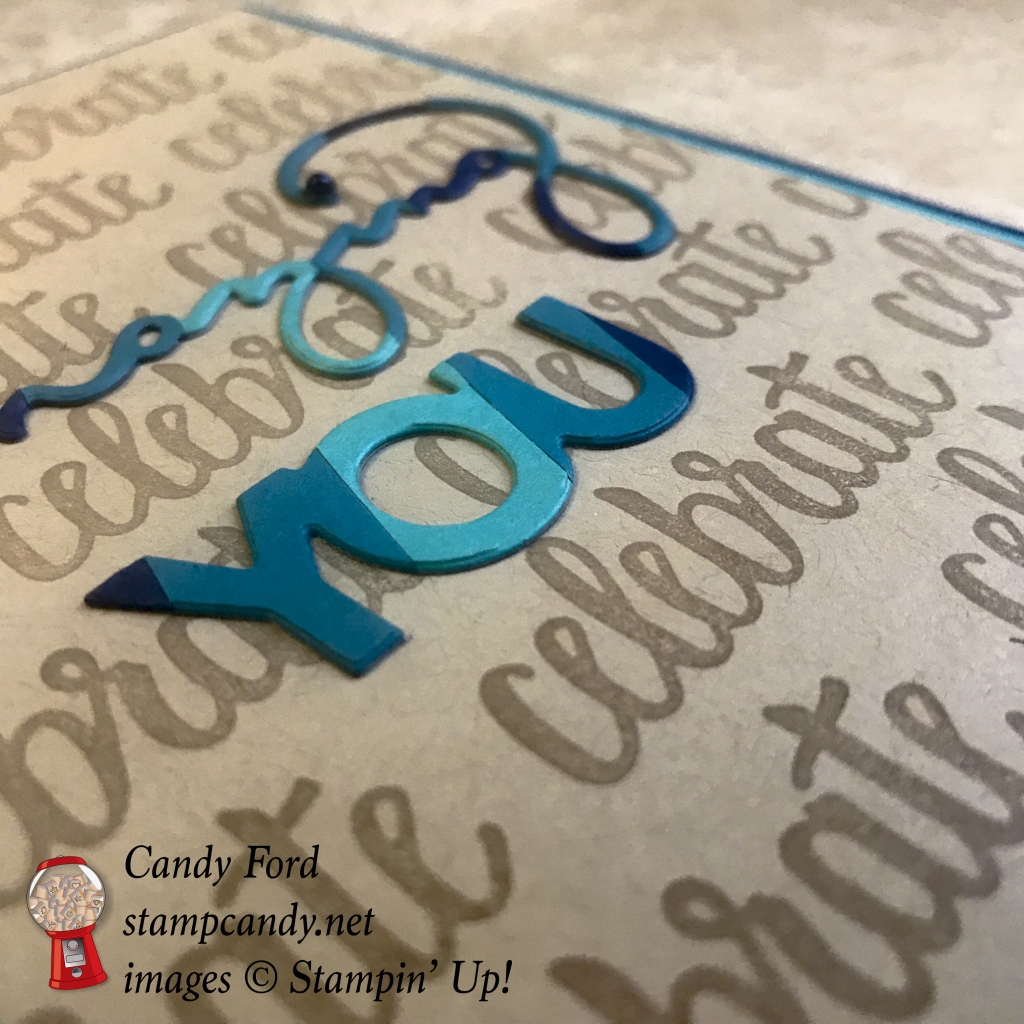
I used a technique whose name I can’t remember to save my life. I glued different colored strips of card stock to a larger piece of CS, then die cut from that, so the die cut words are multicolor. Tell me what you think!
Here’s what I made:
Here’s what I did:
Cut and scored with my Stampin’ Trimmer:
- Crumb Cake card stock (CS) cut to 4-1/4″ x 11″, then scored in half at 5-1/2″
- Night of Navy CS cut to 4-1/8″ x 5-3/8″
- Island Indigo CS cut to 4″ x 5-1/4″
- Bermuda Bay CS cut to 3-7/8″ x 5-1/8″
- Crumb Cake CS cut to 3-3/4″ x 5″
- Crumb Cake CS cut to 3-3/4″ x 3″
- Bermuda Bay, Island Indigo, and Night of Navy CS cut into 1/2″ x 3″ strips, a few of each color
- Optional: Whisper White CS cut to 4″ x 5-1/4″ for the inside
Stamped with the Amazing You stamp set:
- “celebrate” in Crumb Cake ink onto the Crumb Cake CS layer
Die cut using the Celebrate You Thinlits:
- two words from the strips of CS (see below)
- NOTE: I used the Precision Base Plate on the Big Shot to cut through the layers with the Thinlits Dies.
Assembled the card:
- burnished the fold in the card base with a Bone Folder
- Night of Navy CS layer glued onto the front of the card base
- Island Indigo CS layer glued onto the Night of Navy CS layer
- Bermuda Bay CS layer glued onto the Island Indigo CS layer
- stamped Crumb Cake CS layer glued onto the Bermuda Bay CS layer
- 1/2″ strips of CS glued onto the 3-3/4″ x 3″ Crumb Cake CS piece (this is what I die cut the words from above)
- die cut words glued onto the stamped Crumb Cake CS layer
- Optional: Whisper White CS glued onto the inside of the card base
Here’s the hop:
Click the arrow to hop on over to visit Cynthia McQueen of Beautiful Peacock:

Here are today’s colors:
You can click on each one to see all the products that come in that color!
Here’s what I used:
Click on these images for more details and to purchase.
Here’s some stuff you should know:
- This is an amazing time to join the Candy Hearts! Sale-A-Bration is the biggest event of the Stampin’ Up! year and you can save big on the ultimate bundle, the Starter Kit. CLICK HERE for more information.
- Newsletter: subscribe for exclusive deals, projects, and more! Enter your email address and click SUBSCRIBE at the top right of this page, just under the picture of my smiling face. You can also choose to receive an email every day that I have a blog post.
- Check out My Events Calendar HERE
- Host Code for the month of February (2T9AQTKG) Find out more about HOW, WHEN and WHY to use the code HERE.
- My Thank You Gift to You in February: Narrow Note Cards & Envelopes – Find out more HERE.
- Gift Certificates are available in any U.S. dollar amount from me. Contact me – email: candy@stampcandy.net OR call/text: 404-661-5222
- Gumball Rewards for all orders over $50. Find out more HERE.
Contact me with any questions – email: candy@stampcandy.net or call/text: 404-661-5222
Thanks for stopping by today, and Sweet Stamping!
Feb 7, 2018 | Cards, Gallery, Guest Stamper, Sale-A-Bration, Swaps |
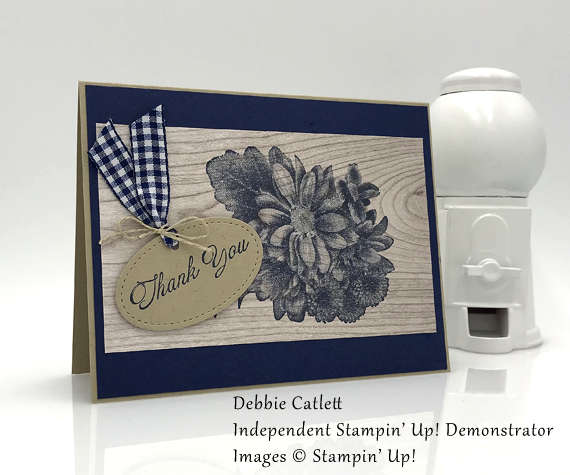
Today I’m excited to share a card made by one of my Candy Hearts team members, Debbie Catlett. Everything she makes is amazing. Her attention to detail and eye for pretty cards make her projects some of the best I’ve seen. She continues to amaze each month at our Hearts gathering with her swap cards. For today’s project, Debbie used the new Heartfelt Blooms stamp set from the 2018 Sale-A-Bration catalog along with the Wood Textures Designer Series Paper and Stitched Shapes Framelits Dies to create a beautifully rustic thank you card.
The Heartfelt Blooms stamp set is made using a new process to create a photorealistic image with only one stamp. Similar images typically use 2 – 3 stamps applied in layers, such as the Sweet Little Something stamp set.
AND the Heartfelt Blooms stamp set is FREE with a $50 order, but only through March 31, 2018. Be sure to take advantage of this amazing Sale-A-Bration opportunity.
Here’s what she made:

Here’s what she did:
Cut and scored with my Stampin’ Trimmer:
- Crumb Cake card stock (CS) cut to 5-1/2″ x 8-1/2″, then scored in half at 4-1/4″
- Night of Navy CS cut to 5-3/8″ x 4-1/8″
- Wood Textures Designer Series Paper (DSP) cut to 5-1/8″ x 3″
- Optional: Whisper White CS cut to 5-1/4″ x 4″ for the inside of the card
Stamped with the Heartfelt Blooms stamp set:
- flower image in Night of Navy ink onto the DSP
- sentiment in Night of Navy ink onto a scrap of Crumb Cake CS
Die cut using the Stitched Shapes Framelits:
Cut using the 1/8″ Circle Punch:
- hole in the top of the sentiment tag
Assembled the card:
- burnished the fold in the card base with a Bone Folder
- Night of Navy CS layer glued onto the front of the card base
- DSP glued onto the Night of Navy CS layer
- piece of Night of Navy Gingham Ribbon through the hole in the tag
- piece of Linen Thread tied in a bow around the Night of Navy ribbon
- tag adhered to the DSP with Stampin’ Dimensionals
- Optional: Whisper White CS glued to the inside of the card base
Here are today’s main colors:
You can click on each one to see all the products that come in that color!
Here’s what she used:
Click on these images for more details and to purchase.
Here’s some stuff you should know:
- This is a fabulous time to join my team! Sale-A-Bration is the biggest event of the Stampin’ Up! year and you can save big on the ultimate bundle, the Starter Kit. CLICK HERE for more information. Contact me with any questions: email candy@stampcandy.net or call/text 404-661-5222
- Newsletter: subscribe for exclusive deals, projects, and more! Enter your email address and click SUBSCRIBE at the top right of this page, just under the picture of my smiling face. You can also choose to receive an email every day that I have a blog post.
- Check out My Events Calendar HERE
- Host Code for the month of February (2T9AQTKG) Find out more about HOW, WHEN and WHY to use the code HERE.
- My Thank You Gift to You in February: Narrow Note Cards & Envelopes – Find out more HERE.
- Gift Certificates are available in any U.S. dollar amount from me. Contact me – email: candy@stampcandy.net OR call/text: 404-661-5222
- Gumball Rewards for all orders over $50. Find out more HERE.
Thanks for stopping by today, and Sweet Stamping!
Feb 3, 2018 | Cards, Gallery, Sale-A-Bration, Swaps |
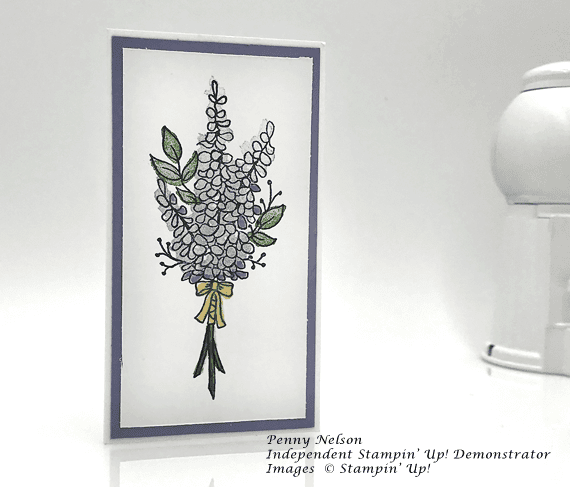
Today I’m excited to share one of the swap cards I received recently from Penny Nelson of designsbypenny.wordpress.com. Penny is a Stampin’ Up! Demonstrator who lives in Katy, TX. We met when we, along with 4 other Demos, earned the Rising Star award our first year with Stampin’ Up!
Penny used the new Sale-A-Bration stamp set, Lots of Lavender, and the new Whisper White Narrow Cards & Envelopes for today’s card.
Be sure to check back as I’ll be posting more swap cards I’ve received from the Rising Stars!
Here’s what she made:

Here’s what she did:
Cut and scored with her Stampin’ Trimmer:
- Wisteria Wonder card stock (CS) cut to 2-1/4″ x 4-1/4″
- Whisper White CS cut to 2″ x 4″
Stamped with the Lots of Lavender stamp set:
- outline image in Basic Black ink onto the Whisper White CS layer
- leaves and stems in Garden Green ink, filling in the outline
- flowers in Wisteria Wonder ink, filling in the outline
- bow in So Saffron ink, filling in the outline
Assembled the card:
- burnished the fold in the pre-made card base with a Bone Folder
- stamped CS glued onto the Wisteria Wonder CS layer
- Wisteria Wonder CS layer glued to the front of the card base
- NOTE: These cards fits perfectly into the accompanying envelopes
Here are today’s colors:
You can click on each one to see all the products that come in that color!
Here’s what she used:
Click on these images for more details and to purchase.
Here’s some stuff you should know:
- This is a fabulous time to join my team! Sale-A-Bration is the biggest event of the Stampin’ Up! year and you can save big on the ultimate bundle, the Starter Kit. CLICK HERE for more information. Contact me with any questions: email candy@stampcandy.net or call/text 404-661-5222
- Newsletter: subscribe for exclusive deals, projects, and more! Enter your email address and click SUBSCRIBE at the top right of this page, just under the picture of my smiling face. You can also choose to receive an email every day that I have a blog post.
- Check out My Events Calendar HERE
- Host Code for the month of February (2T9AQTKG) Find out more about HOW, WHEN and WHY to use the code HERE.
- My Thank You Gift to You in February: Narrow Note Cards & Envelopes – Find out more HERE.
- Gift Certificates are available in any U.S. dollar amount from me. Contact me – email: candy@stampcandy.net OR call/text: 404-661-5222
- Gumball Rewards for all orders over $50. Find out more HERE.
Thanks for stopping by today, and Sweet Stamping!
Feb 1, 2018 | Cards, Gallery, Occasions, Sale-A-Bration |
Today’s project is Made With Love. It’s a feminine card made with the Apron of Love bundle (Apron of Love stamp set and Apron Builder Framelits Dies.) You save 10% when you buy both products together in a bundle! Click here to see the masculine apron card I shared a few days ago.
Just like the other card, I used my Stylus that came with my Simply Scored scoring tool to draw lines on the oven mitt, to give it a quilted look. I used a piece of Tutti-frutti Designer Series Paper (DSP) for the fabric of the apron. Doesn’t it look like an apron from the 1940s or 1950s? I think my aunt Mildred had one just like it!
Here’s what I made:


Here’s what I did:
Cut with my Stampin’ Trimmer:
- Whisper White card stock (CS) cut to 3-3/4″ x 5″
Die cut using the Apron Builder Framelits:
- apron from a scrap of Tutti-frutti Designer Series Paper (DSP)
- pocket, mitt, neck strap, and 2 apron strings from Real Red CS
- utensils from a scrap of Silver Foil Sheet
- rolling pin from a scrap of Wood Textures DSP
Stamped with the Apron of Love stamp set:
- sentiment in Real Red ink onto the Whisper White CS layer, near the bottom
- small sentiment in Basic Black ink onto the die cut apron pocket
Embossed with a Stylus:
- drew lines on the oven mitt, to make it look quilted (I found it impossible to make the lines show well in a photo.)
Assembled the card:
- burnished the fold in the card base (from the Tutti-frutti Cards & Envelopes, which are free with a $50 order, through March 31!) with a Bone Folder
- Whisper White CS layer glued onto the front of the card base
- neck strap and apron strings glued to the back of the apron
- utensils (spoon, rolling pin, whisk, spatula, and tongs) glued onto the back of the pocket
- pocket and utensils glued to the front of the apron
- NOTE: the white spatula is cut from the Silver Foil Sheet, then turned around to the white side
- apron glued onto the Whisper White CS layer
- mitt glued onto the Whisper White CS layer
Here are today’s colors:
You can click on each one to see all the products that come in, or with, that color!
Here’s what I used:
Click on these images for more details and to purchase.
Here’s some stuff you should know:
- This is a fabulous time to join my team! Sale-A-Bration is the biggest event of the Stampin’ Up! year and you can save big on the ultimate bundle, the Starter Kit. CLICK HERE for more information. Contact me with any questions: email candy@stampcandy.net or call/text 404-661-5222
- Newsletter: subscribe for exclusive deals, projects, and more! Enter your email address and click SUBSCRIBE at the top right of this page, just under the picture of my smiling face. You can also choose to receive an email every day that I have a blog post.
- Check out My Events Calendar HERE
- Host Code for the month of February (2T9AQTKG) Find out more about HOW, WHEN and WHY to use the code HERE.
- My Thank You Gift to You in February: Narrow Note Cards & Envelopes – Find out more HERE.
- Gift Certificates are available in any U.S. dollar amount from me. Contact me – email: candy@stampcandy.net OR call/text: 404-661-5222
- Gumball Rewards for all orders over $50. Find out more HERE.
Thanks for stopping by today, and Sweet Stamping!
