Jan 27, 2018 | Cards, Gallery, Occasions, Sale-A-Bration |
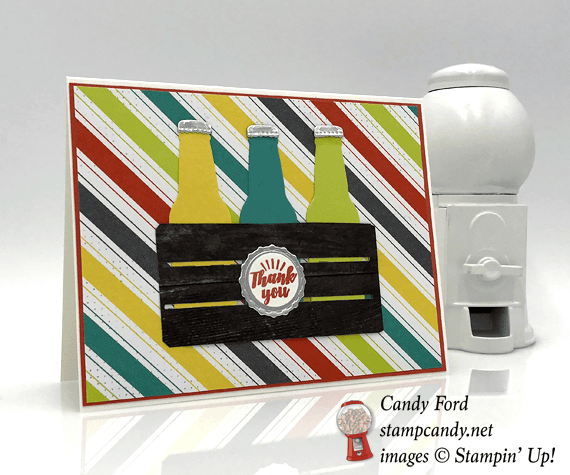
The Bubble Over Bundle (Bubble Over stamp set and Bottles & Bubbles Framelits Dies) allows you to create super cute, super fun projects, like today’s card. The bright colors of this fun thank you card are inspired by the Bubbles & Fizz Designer Series Paper (which you can get FREE with a $50 order!!!) My sister inspired the design, with the awesome idea of putting the bottles in a wooden crate, made with the Wood Crate Framelits Dies and Wood Textures Designer Series Paper.
Here’s what I made:
Here’s what I did:
Cut and scored with my Stampin’ Trimmer:
- Whisper White Thick card stock (CS) cut to 5-1/2″ x 8-1/2″, then scored in half at 4-1/4″
- Calypso Coral CS cut to 5-3/8″ x 4-1/8″
- Bubbles & Fizz Designer Series Paper (DSP) cut to 5-1/4″ x 4″
Stamped with the Bubble Over stamp set:
- sentiment in Calypso Coral ink onto a scrap of Whisper White CS
Die cut using the Bottles & Bubbles Framelits:
- 3 bottles from scraps of Daffodil Delight, Bermuda Bay, and Lemon Lime Twist CS
- 3 bottle caps (for the tops of the bottles) from a scrap of Silver Foil Sheet
- 1 bottle cap (round for the sentiment) from a scrap of Silver Foil Sheet
Die cut using the Wood Crate Framelits:
- one side of the crate from Wood Textures DSP, then trimmed away the excess bits with Paper Snips
Cut using the 3/4″ Circle Punch:
Assembled the card:
- burnished the fold in the card base with a Bone Folder
- Calypso Coral CS layer glued onto the front of the card base
- Bubbles & Fizz DSP layer glued onto the Calypso Coral CS layer
- 3 bottles glued to the back of the crate
- bottles and crate glued onto the DSP layer
- 3 small bottle caps glued onto the bottles
- sentiment adhered to the round bottle cap with Fast Fuse
- round bottle cap glued onto the crate
Here are today’s main colors:
You can click on each one to see all the products that come in, or with, that color!
Here’s what I used:
Click on these images for more details and to purchase.
Here’s some stuff you should know:
- This is a fabulous time to join my team! Sale-A-Bration is the biggest event of the Stampin’ Up! year and you can save big on the ultimate bundle, the Starter Kit. CLICK HERE for more information. Contact me with any questions: email candy@stampcandy.net or call/text 404-661-5222
- Newsletter: subscribe for exclusive deals, projects, and more! Enter your email address and click SUBSCRIBE at the top right of this page, just under the picture of my smiling face. You can also choose to receive an email every day that I have a blog post.
- Check out My Events Calendar HERE
- Host Code for the month of January (XNNMNZSZ) Find out more about HOW, WHEN and WHY to use the code HERE.
- My Thank You Gift to You in January: Silver Embossing Paste – Find out more HERE.
- Gift Certificates are available in any U.S. dollar amount from me. Contact me – email: candy@stampcandy.net OR call/text: 404-661-5222
- Gumball Rewards for all orders over $50. Find out more HERE.
Thanks for stopping by today, and Sweet Stamping!

Jan 17, 2018 | Cards, Club, Gallery, New Products, Occasions, Sale-A-Bration |
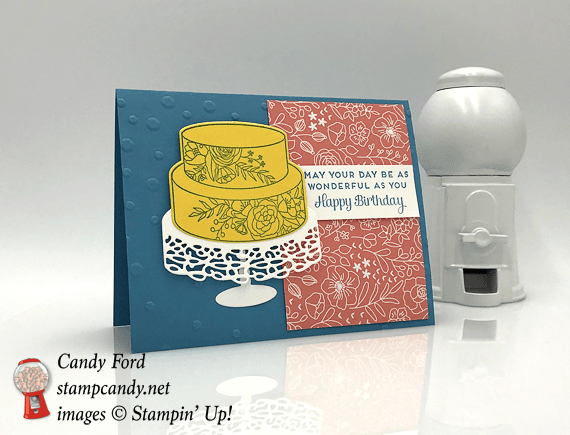
Who wouldn’t love to get a big yellow cake with white flowers piped on it for their birthday? Especially on a beautifully lacy cake stand! That’s the gist of this birthday card, made using the Cake Soiree stamp set, Sweet Cake Framelits Dies, and Sweet Soiree Designer Series Paper. The Scattered Sequins Dynamic Textured Embossing Folder (TIEF) adds a little something special to the background.
Here’s what I made:
Here’s what I did:
Cut and scored with my Stampin’ Trimmer:
- Marina Mist card stock (CS) cut to 5-1/2″ x 8-1/2″, then scored in half at 4-1/4″
- Sweet Soiree Designer Series Paper (DSP) cut to 2-1/2″ x 4″
- Whisper White CS cut to 2-1/2″ x 1″
- Whisper White CS cut to 5-1/4″ x 4″ for the inside
Stamped with the Cake Soiree stamp set:
- sentiment in Marina Mist ink onto the 2-1/2″ x 1″ Whisper White CS
- cake in Marina Mist ink onto a scrap of Daffodil Delight CS
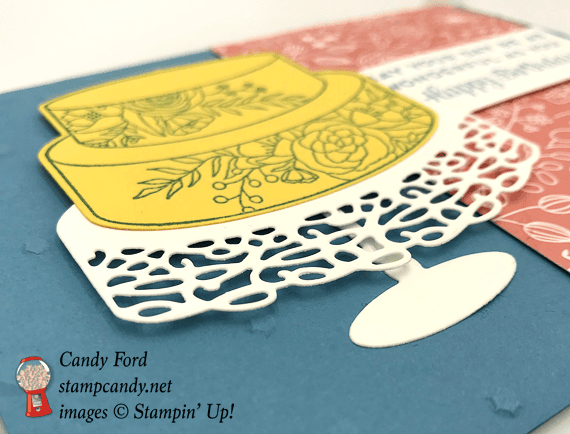
Die cut using the Sweet Cake Framelits:
- cake
- stand from a scrap of Whisper White CS
- stand base from a scrap of Whisper White CS
Ran through the Big Shot with the Scattered Sequins Dynamic embossing folder:
- front half of the card base
Assembled the card:
- burnished score line in card base with a Bone Folder
- DSP glued onto the front right of the card base
- sentiment strip glued onto the DSP lining up the edges along the right side
- stand base flued onto the front of the card base
- cake glued onto cake stand
- cake & stand adhered to the front of the card base with Stampin’ Dimensionals
- Whisper White CS glued to the inside of the card base
Here are today’s colors:
You can click on each one to see all the products that come in that color!
Here’s what I used:
Click on these images for more details and to purchase.
Here’s some stuff you should know:
- This is a fabulous time to join my team! Sale-A-Bration is the biggest event of the Stampin’ Up! year and you can save big on the ultimate bundle, the Starter Kit. CLICK HERE for more information. Contact me with any questions: email candy@stampcandy.net or call/text 404-661-5222
- Newsletter: subscribe for exclusive deals, projects, and more! Enter your email address and click SUBSCRIBE at the top right of this page, just under the picture of my smiling face. You can also choose to receive an email every day that I have a blog post.
- Check out My Events Calendar HERE
- Host Code for the month of January (XNNMNZSZ) Find out more about HOW, WHEN and WHY to use the code HERE.
- My Thank You Gift to You in January: Silver Embossing Paste – Find out more HERE.
- Gift Certificates are available in any U.S. dollar amount from me. Contact me – email: candy@stampcandy.net OR call/text: 404-661-5222
- Gumball Rewards for all orders over $50. Find out more HERE.
Thanks for stopping by today, and Sweet Stamping!
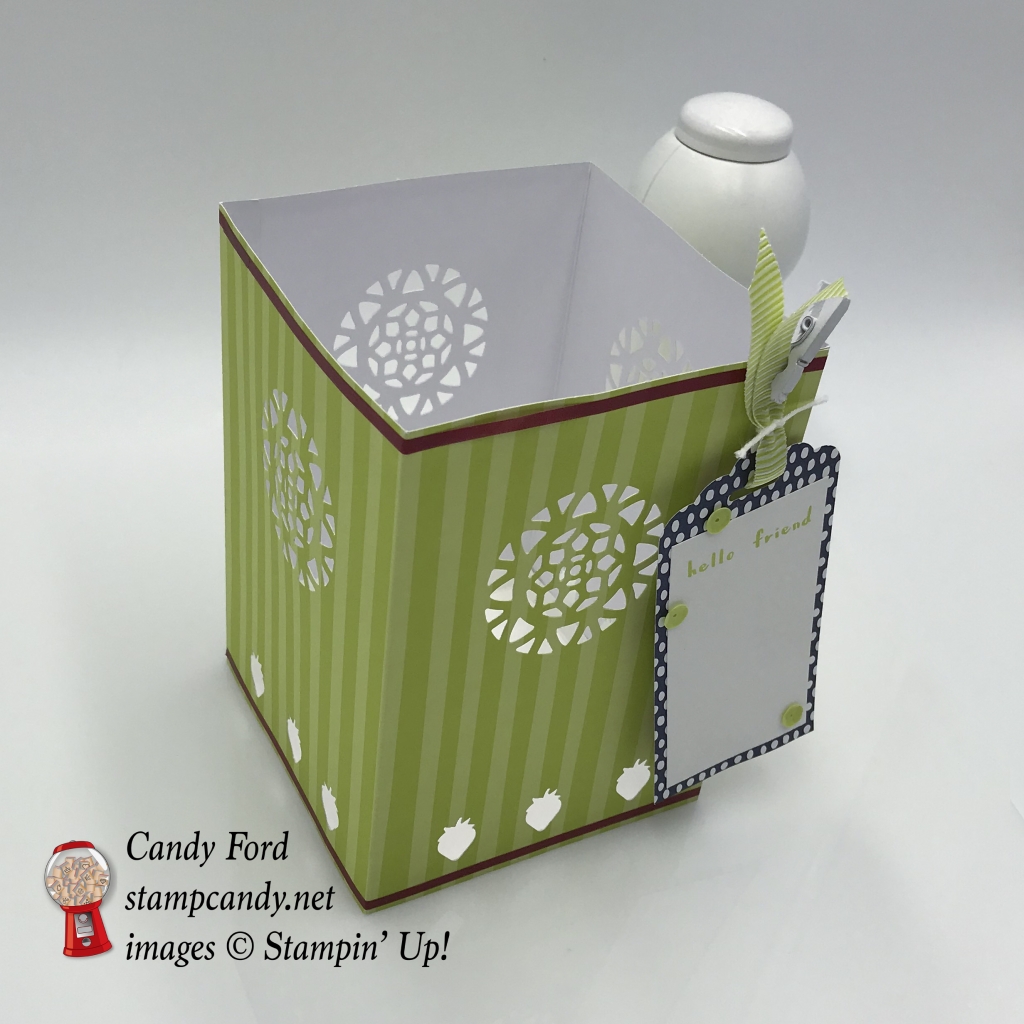
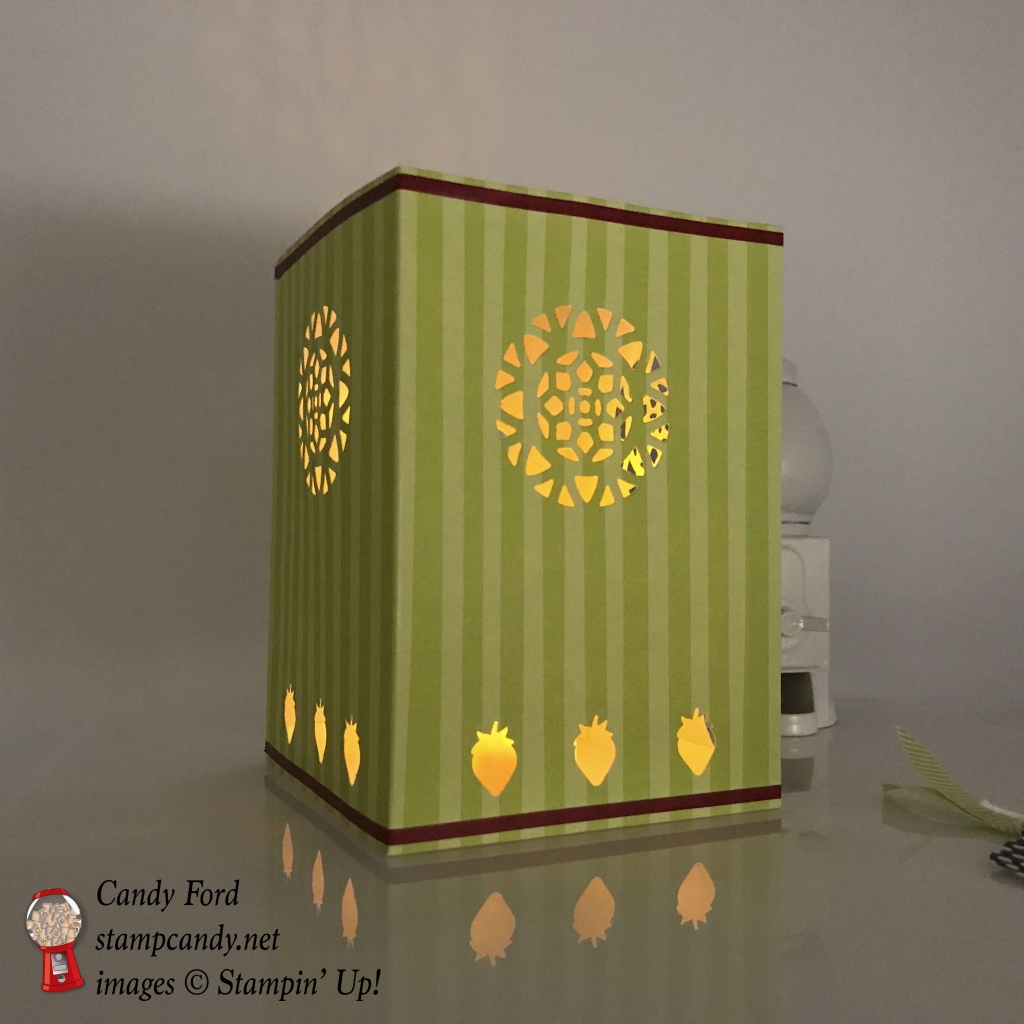
Jan 11, 2018 | Blog Hop, Boxes, Cards, Decor, Gallery, Gifts, New Products, Occasions, Sale-A-Bration, Tags |

This is my first time participating in the One Stamp at a Time (OSAT) Blog Hop. I’m thrilled to join this talented group of stampers. After you read my post, I hope you’ll click through to the next stop on the hop.
Today we’re highlighting products from the 2018 Occasions and Sale-A-Bration Catalogs. I chose the Tutti-Frutti Suite from the Occasions Catalog (p.28-29) and the coordinating Tutti-Frutti Cards & Envelopes from the Sale-A-Bration Catalog (p.14.) These products are chock full of sweet images, sentiments, and embellishments – even self adhesive sequins! And the colors are what I call Happy Colors. Just look at the the colors in the Tutti-Frutti Designer Series Paper:

Here’s what I made:
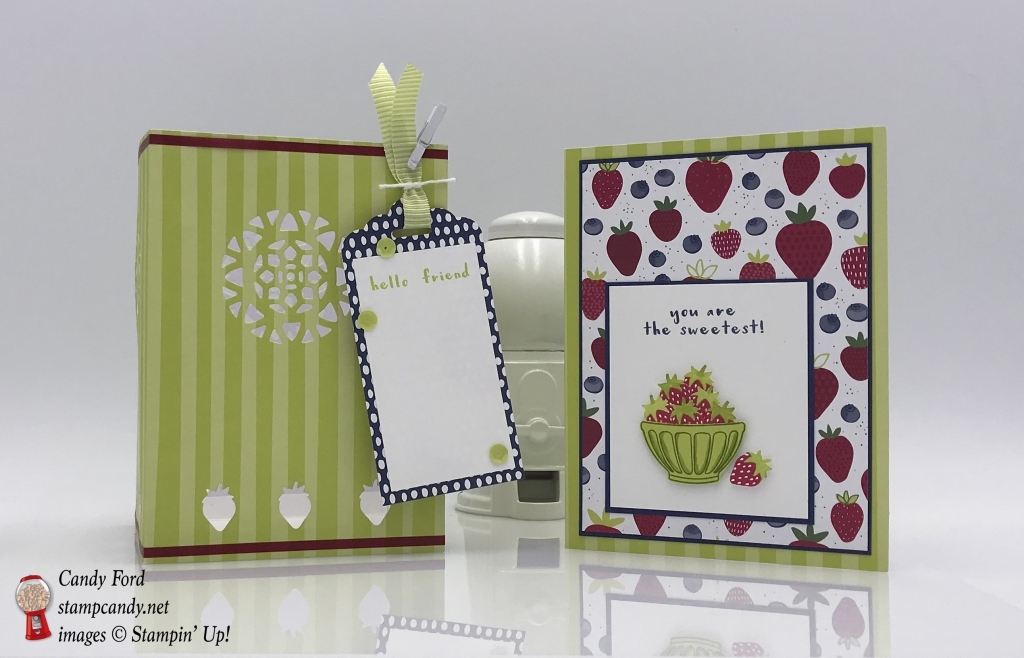
Tea light holder:
Tea light holder with a lit tea light inside: (Only use a battery operated tea light – never real flame.)
Tag front:

Tag back:


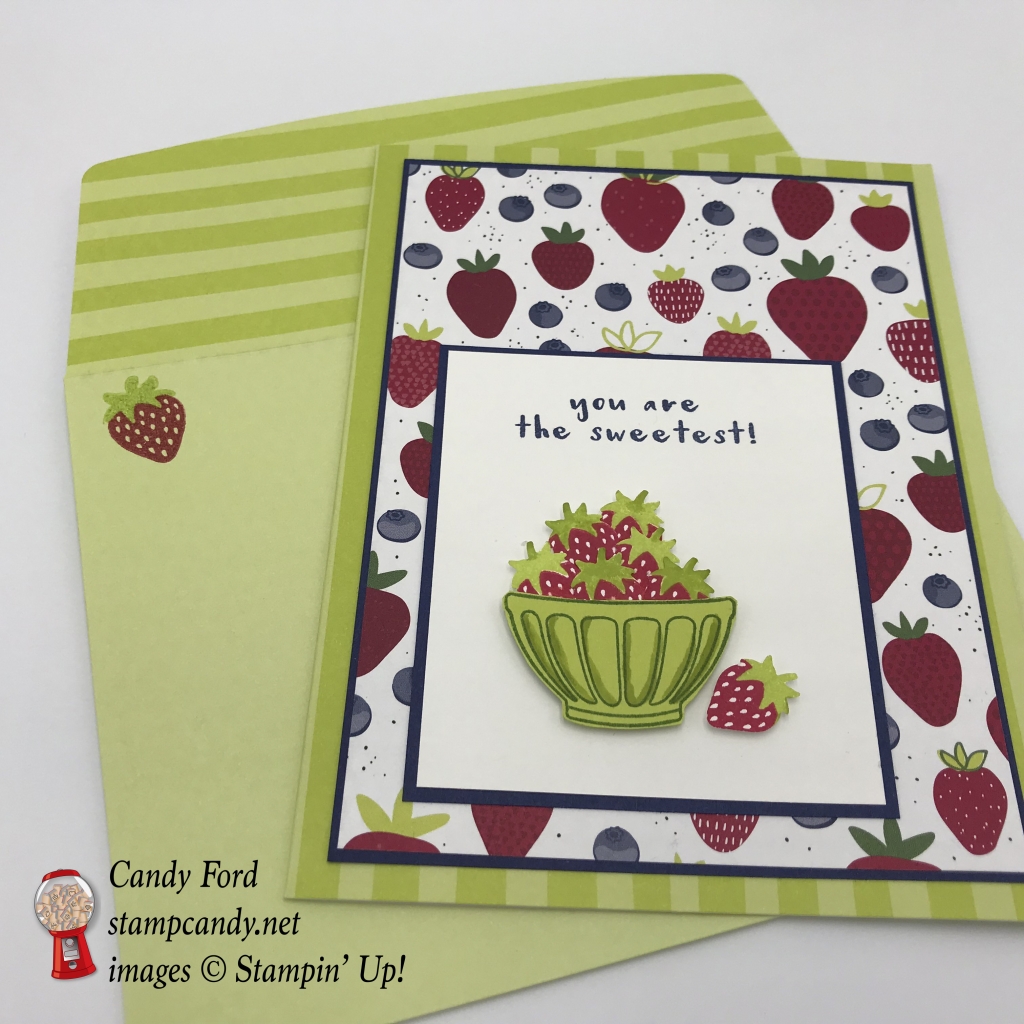
Inside of the card:

Here’s what I did:
Cut and scored with my Stampin’ Trimmer:
- Night of Navy card stock (CS) cut to 3-7/8″ x 5-1/8″
- Tutti-Frutti Designer Series Paper (DSP) cut to 3-3/4″ x 5″
- Night of Navy CS cut to 2-3/4″ x 3-1/8″
- Whisper White CS cut to 2-5/8″ x 3″
- 2 Tutti-Frutti card bases – 3/8″ cut off one end, and scored 3/8″ from the other end
- Whisper White CS cut to 4-1/8″ x 4-1/8″, then scored 1/4″ from each of the four sides
- Tutti-Frutti DSP cut to 2″ x 4″
- Whisper White CS cut to 1-3/4″ x 3-1/8″
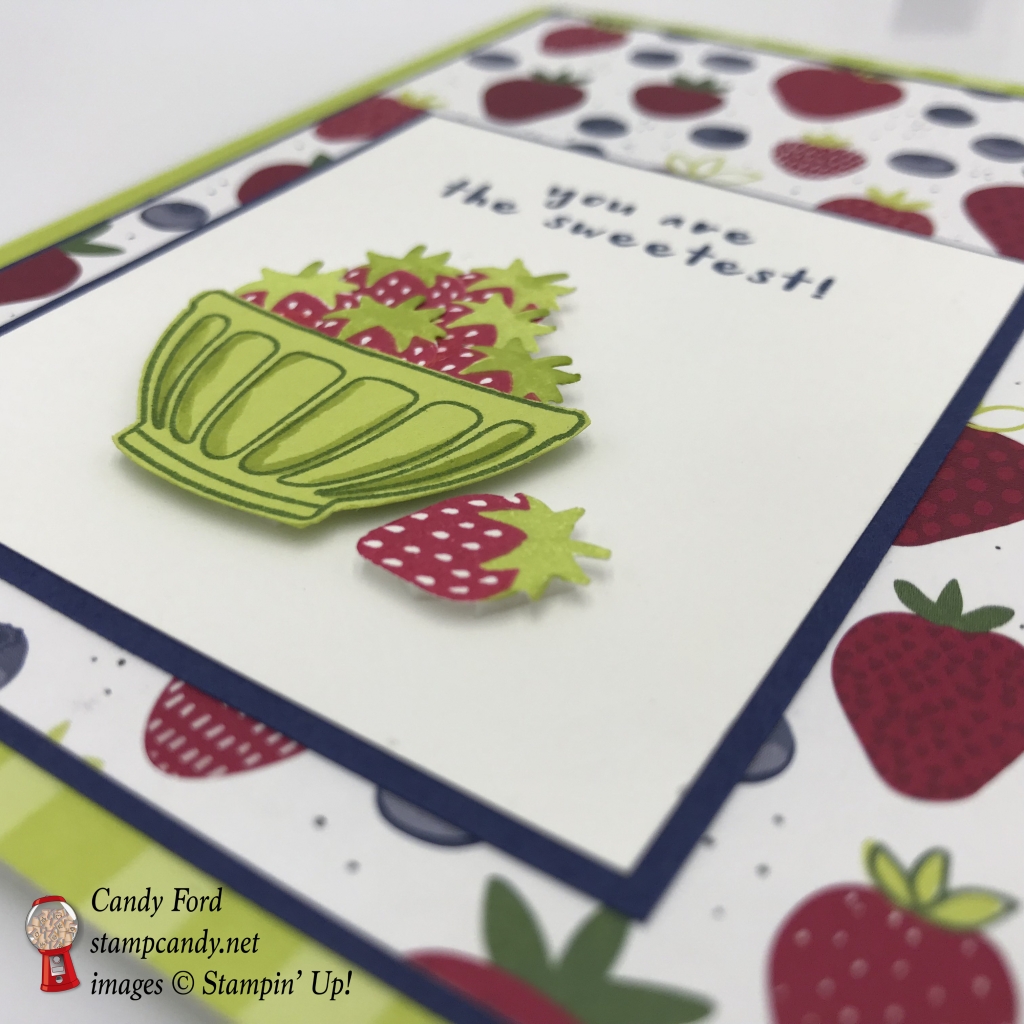
Stamped with the Fruit Basket stamp set:
- bowl in Garden Green ink onto a scrap of Lemon Lime Twist CS
- 7 strawberries in Real Red and Lemon Lime Twist inks onto a scrap of Whisper White CS
- card sentiment in Night of Navy ink onto the 2-5/8″ x 3″ Whisper White CS
- tag sentiment in Lemon Lime Twist ink onto the 1-3/4″ x 3-1/8″ Whisper White CS
- a strawberry in Real Red and Lemon Lime Twist inks onto the inside of a third card base
- a strawberry in Real Red and Lemon Lime Twist inks onto the front of the envelope
Cut using the Itty Bitty Fruit Punch Pack:
- 7 strawberries from the Whisper White CS scrap
- 3 strawberries from each side of the 2 trimmed card bases, near the bottom
Cut with the Scalloped Tag Topper Punch:
- one end of the 2″ x 4″ DSP, to create the tag
Die cut using the Eastern Medallion Thinlits:
- a medallion from each side of the 2 trimmed card bases
Cut using Paper Snips:
Colored using a Stampin’ Write Marker:
- darkened some of the strawberry tops in Lemon Lime Twist
- added shadows to the bowl in Lemon Lime Twist
Assembled the card:
- 6 strawberries glued onto the back of the bowl
- bowl of strawberries and the one remaining strawberry adhered to the 2-5/8″ x 3″ Whisper White CS with Mini Stampin’ Dimensionals
- 2-5/8″ x 3″ Whisper White CS glued onto the 2-3/4″ x 3-1/8″ Night of Navy CS
- 2-3/4″ x 3-1/8″ Night of Navy CS glued onto the 3-3/4″ x 5″ DSP
- 3-3/4″ x 5″ DSP DSP glued onto the 3-7/8″ x 5-1/8 Night of Navy CS
- 3-7/8″ x 5-1/8 Night of Navy CS glued onto the front of the card base (this is the untrimmed card base with a strawberry stamped inside)
Assembled the tealight holder:
- burnished all score lines of the 2 trimmed card bases with a Bone Folder
- adhered the 3/8″ section of each card base to the inside of the other card base, to form the four sides of the holder
- burnished all score lines of the 4-1/8″ x 4-1/8″ Whisper White CS with a Bone Folder
- cut one score line at each corner to create tabs
- glued each tab to the inside of the adjacent side to create a tray for the bottom of the holder
- put the tray inside the holder and glue on all four sides – I found it easiest to drop the tray down into the holder and press it to the bottom, then flip it over and squeeze a little glue between the two pieces.
- applied Tutti-Frutti Washi Tape around the top and bottom of the holder
- NOTE: You can just have the four sides. You don’t have to have the bottom tray, but I think it adds stability and shape to the holder.
Assembled the tag:
- 3/4″ x 3-1/8″ Whisper White CS glued to the blue side of the DSP tag
- 3 self adhesive sequins applied to the tag
- ran 5″ of Lemon Lime Twist 3/8″ Mini Striped Ribbon through the hole
- tied a piece of Whisper White Solid Twine around the ribbon
- attached tag to the tealight holder with a mini white clothes pin from the Sweet Soiree Embellishment Kit
Here’s the hop:
Click the image to go to the next stop, Pam Staples of Sunny Girl Scraps:
Here’s the full list in case you get lost:
- Barb Mullikin
- Melissa Davies
- Elizabeth Jeanne
- Dani Dziama
- Angela Meiritz-Reid
- Jenny Hall
- Maria Willis
- Jessie Holton
- Candy Ford <–YOU ARE HERE
- Pam Staples
- Cathy Caines
- Kelly Acheson
- Jay Soriano
- Sara Levin
- Tina Rackley Riddle
- Claudia Perry
- Jennifer Hill
- Dena Rekow
- Lori Mueller
- Marisa Gunn
- Andrea Tracy Tucker
- Raquelle Clifton
- Renee Ondrajka
- Jeanna Kay
- Rick Adkins
Here are today’s main colors:
You can click on each one to see all the products that come in that color!
Here’s what I used:
Click on the images for more details and to purchase.
Here’s some stuff you should know:
- SAB Stamp Fest – ONLY 2 DAYS LEFT TO REGISTER! It happens January 20. See the details and register HERE by January 13!
- Sale-A-Bration is in full swing! Earn lots of free products! Get the details HERE.
- This is a fabulous time to join my team! Sale-A-Bration is the biggest event of the Stampin’ Up! year and you can save big on the ultimate bundle, the Starter Kit. CLICK HERE for more information. Contact me with any questions: email candy@stampcandy.net or call/text 404-661-5222
- Newsletter: subscribe for exclusive deals, projects, and more! Enter your email address and click SUBSCRIBE at the top right of this page, just under the picture of my smiling face. You can also choose to receive an email every day that I have a blog post.
- Check out My Events Calendar HERE
- Host Code for the month of January (XNNMNZSZ) Find out more about HOW, WHEN and WHY to use the code HERE.
- My Thank You Gift to You in January: Silver Embossing Paste – Find out more HERE.
- Gift Certificates are available in any U.S. dollar amount from me. Contact me – email: candy@stampcandy.net OR call/text: 404-661-5222
- Gumball Rewards for all orders over $50. Find out more HERE.
Thanks for stopping by today, and Sweet Stamping!
Jan 5, 2018 | Cards, Gallery, Occasions, Sale-A-Bration |
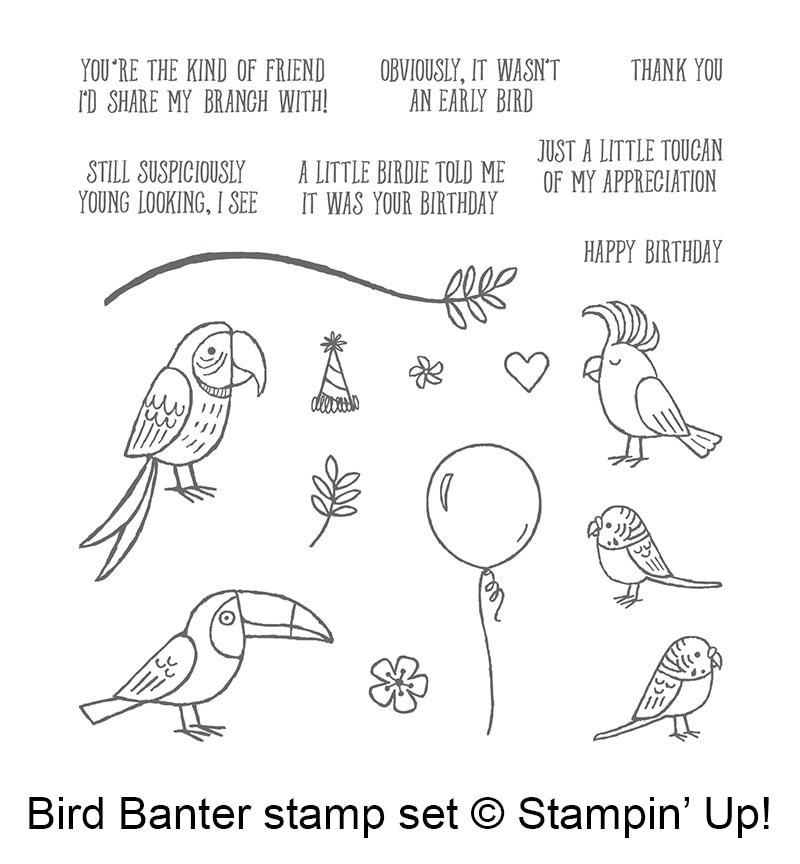
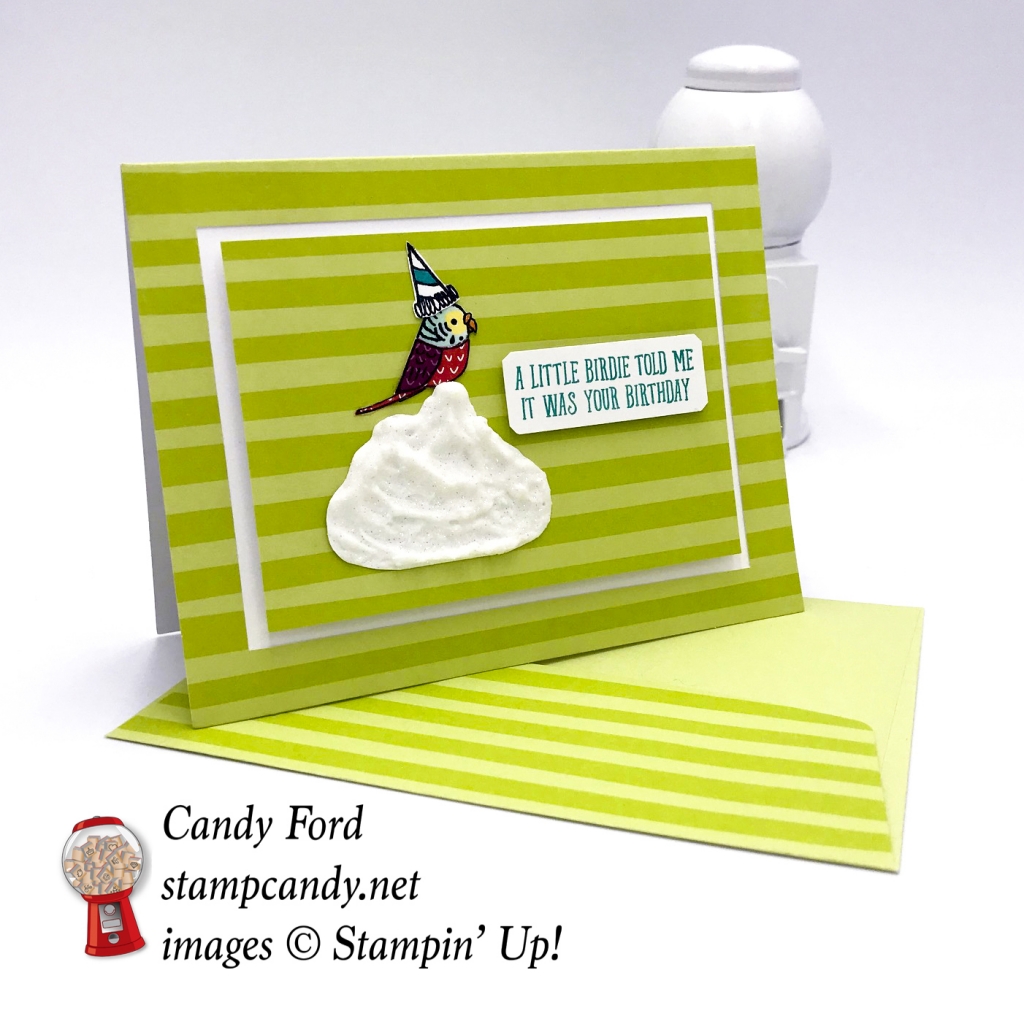
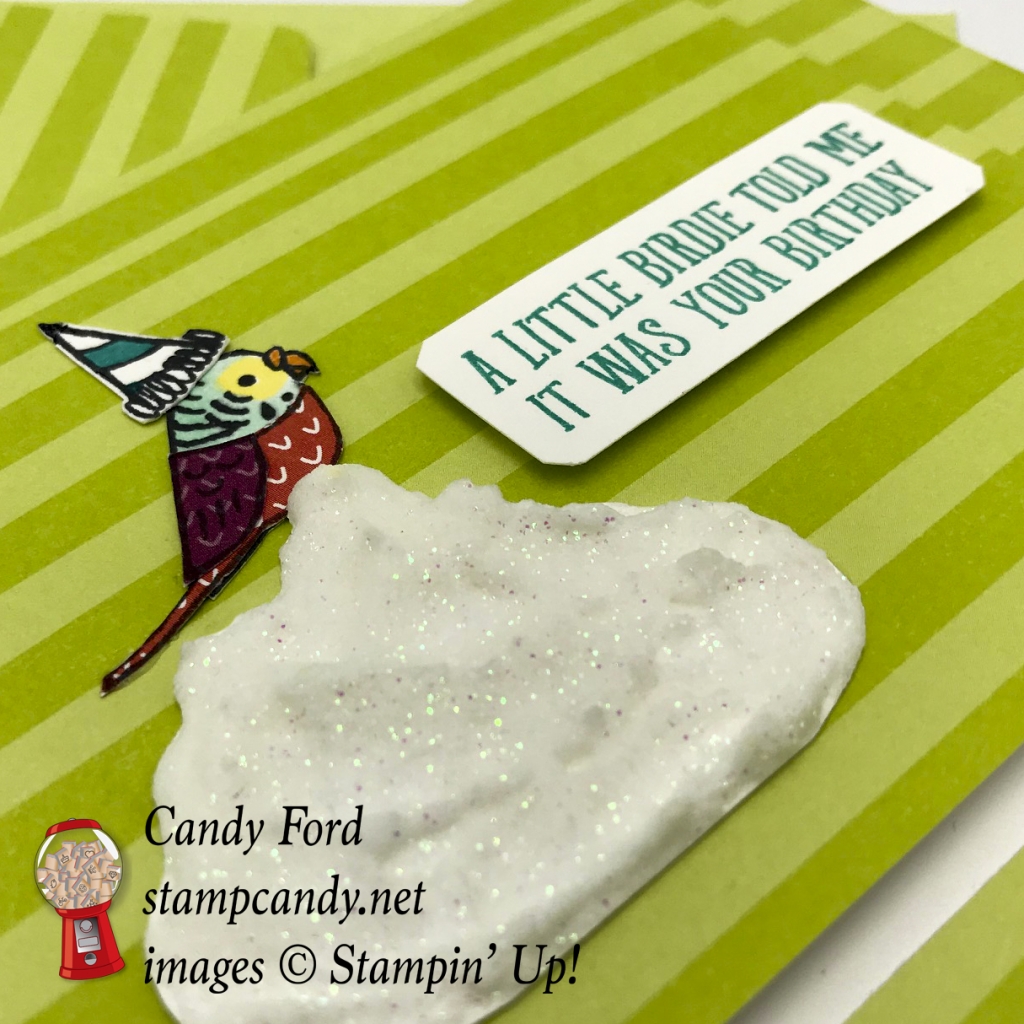
Today is National Bird Day and National Whipped Cream Day, so I made a card for both. I used the new Bird Banter stamp set to create the paper pieced birdie, and the Cupcake Cutout Framelits Dies and the new Shimmery White Embossing Paste to create the whipped cream. I think the plain white Embossing Paste may have been better, because the shimmery paste seems a bit too glittery for whipped cream. I’ve listed both in the product list farther down in this post.
I thought I was being quite clever, putting the bird on top of the whipped cream. Then a friend of mine saw the card and said it looked like the bird was on top of a pile of bird poo. But it isn’t – it’s whipped cream. Whipped cream, okay?
The card and envelope are from the Tutti Frutti Cards & Envelopes, on page 14 of the Sale-A-Bration Catalog. I used my Stampin’ Trimmer to cut a piece out from the card front, trim it down a little, then adhere it to a piece of Whisper Whit card stock glued to the inside.
Here’s what I made:
Here’s what I did:
Cut and scored with my Stampin’ Trimmer:
- front of the card cut 1/2″ from all four sides, to cut out a 4-1/2″ x 3-1/4″ rectangle
- 1/8″ cut from all four sides of the striped rectangle
- Whisper White card stock (CS) cut to 5-3/8″ x 4-1/8″
- after the sentiment was stamped (see below) I trimmed it to within 1/8″ of the words on all four sides
Stamped with the Bird Banter stamp set:
- the bird image in Basic Gray ink onto three pieces of paper: 2 patterns from the Tutti Frutti Designer Series Paper (DSP) and a scrap of Whisper White CS
- party hat in Basic Gray ink onto a scrap of Whisper White CS
- sentiment in Bermuda Bay ink onto a scrap of Whisper White CS
Colored using Stampin’ Write Markers:
- party hat in Bermuda Bay
- bird’s head in Pool Party and Daffodil Delight
Cut using Paper Snips:
- full body of the bird from the Whisper White CS (I cut off the legs because they have sunk down into the whipped cream!)
- full body minus the head from the Real Red DSP
- wing from the Rich Razzleberry DSP
- party hat
- snipped the corners of the sentiment, after it was trimmed with the Stampin’ Trimmer
Cut using the Cupcake Cutouts Framelits:
- whipped cream shape from a scrap of Whisper White CS
Assembled the card:
- 5-3/8″ x 4-1/8″ Whisper White CS glued around the edges to the inside front of the card base
- striped rectangle adhered to the Whisper White CS with Foam Adhesive Strips. I put a piece along each edge and a few in the middle
- applied embossing paste to the whipped cream die cut with a Palette Knife, then set aside to dry for a few minutes
- three bird pieces glued together
- whipped cream glued to the card front
- bird glued above the whipped cream
- hat glued over bird’s head
- sentiment adhered with Stampin’ Dimensionals
Here are today’s colors:
You can click on each one to see all the products that come in that color!
Here’s what I used:
Click on these images for more details and to purchase.
Here’s some stuff you should know:
- This is a fabulous time to join my team! Sale-A-Bration is the biggest event of the Stampin’ Up! year and you can save big on the ultimate bundle, the Starter Kit. CLICK HERE for more information. Contact me with any questions: email candy@stampcandy.net or call/text 404-661-5222
- SAB Stamp Fest – ONLY 8 DAYS LEFT TO REGISTER! It happens January 20. Details and register HERE by January 13!
- Newsletter: subscribe for exclusive deals, projects, and more! Enter your email address and click SUBSCRIBE at the top right of this page, just under the picture of my smiling face. You can also choose to receive an email every day that I have a blog post.
- Check out My Events Calendar HERE
- Host Code for the month of January (XNNMNZSZ) Find out more about HOW, WHEN and WHY to use the code HERE.
- My Thank You Gift to You in January: Silver Embossing Paste – Find out more HERE.
- Gift Certificates are available in any U.S. dollar amount from me. Contact me – email: candy@stampcandy.net OR call/text: 404-661-5222
- Gumball Rewards for all orders over $50. Find out more HERE.
Thanks for stopping by today, and Sweet Stamping!
Jan 4, 2018 | Cards, Gallery, New Products, Occasions, Sale-A-Bration |
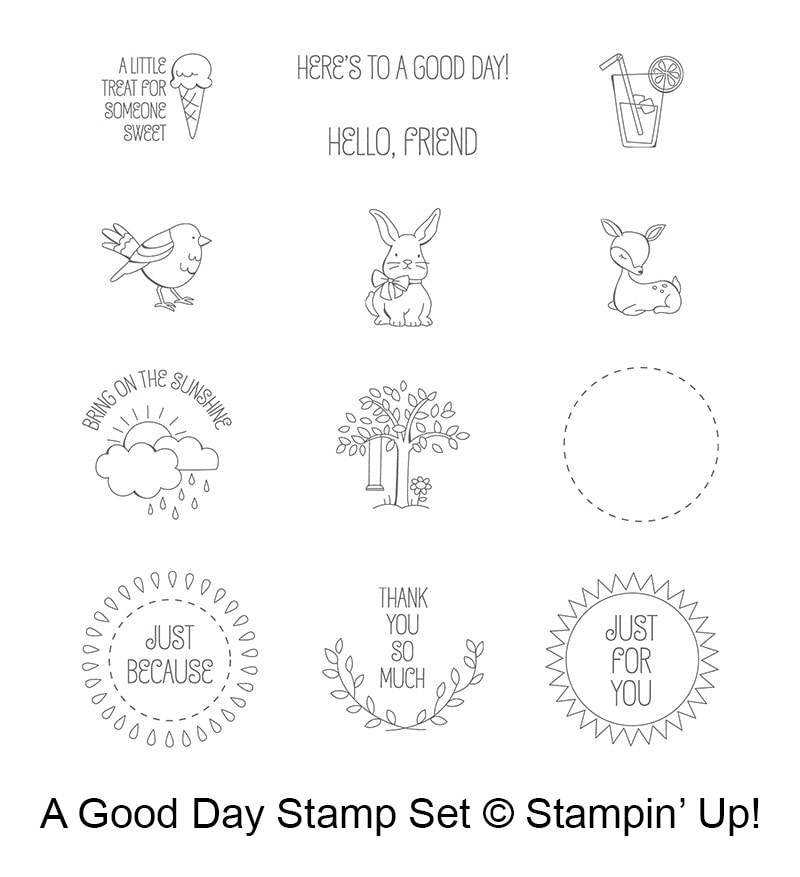
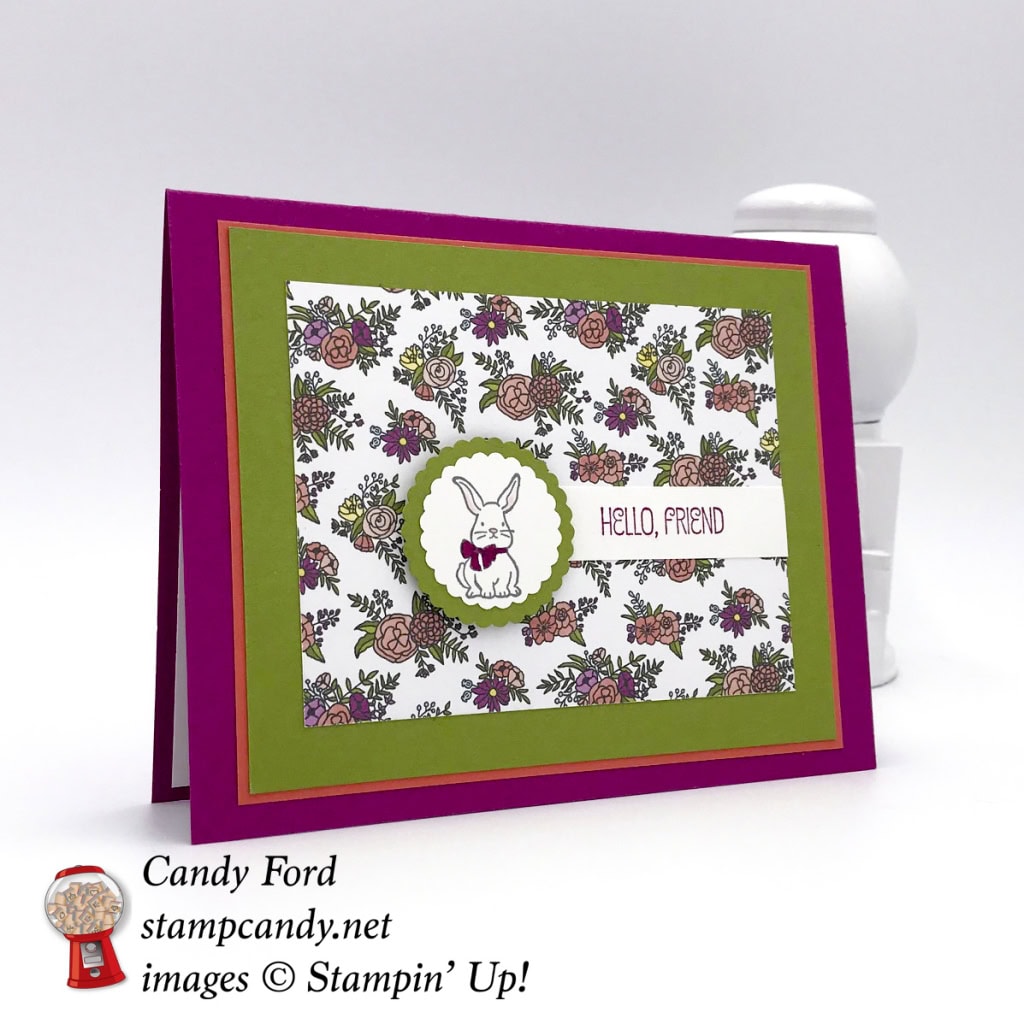
Sometimes a stamp set comes along that you like, but a couple of the stamps in the set you absolutely love. Today’s card is made with one of those. The set is called A Good Day, and it’s full of sweet sentiments and images.
I like everything in the set, but I’m in love with the bunny image. There’s something about the expression on its face. To me it looks like it has just stomped its foot, and now has that tight lipped expression, like it’s trying not to say what it really thinks. Or maybe it’s just concerned about something. Or questioning. No, I think it’s miffed – but in the cutest possible way.
Another new product I used is a 3″ x 4″ card from the Sweet Soiree Memories & More Card Pack, which is a Level 1 Sale-A-Bration item that you can get for FREE with a $50 order!
As a matter of fact, you can purchase the A Good Day stamp set ($19 clear mount, or $27 wood mount) and the two scallop circle punches listed below ($16 each) and get the Card Pack FREE!

It’s National Trivia Day! So here’s some bunny trivia: The American Rabbit Breeders Association (ARBA) recognizes 48 unique rabbit breeds. The British Rabbit Council (BRC) recognizes over 60 breeds.
Here’s what I made:

Inside the card, the bunny peeks up from the bottom.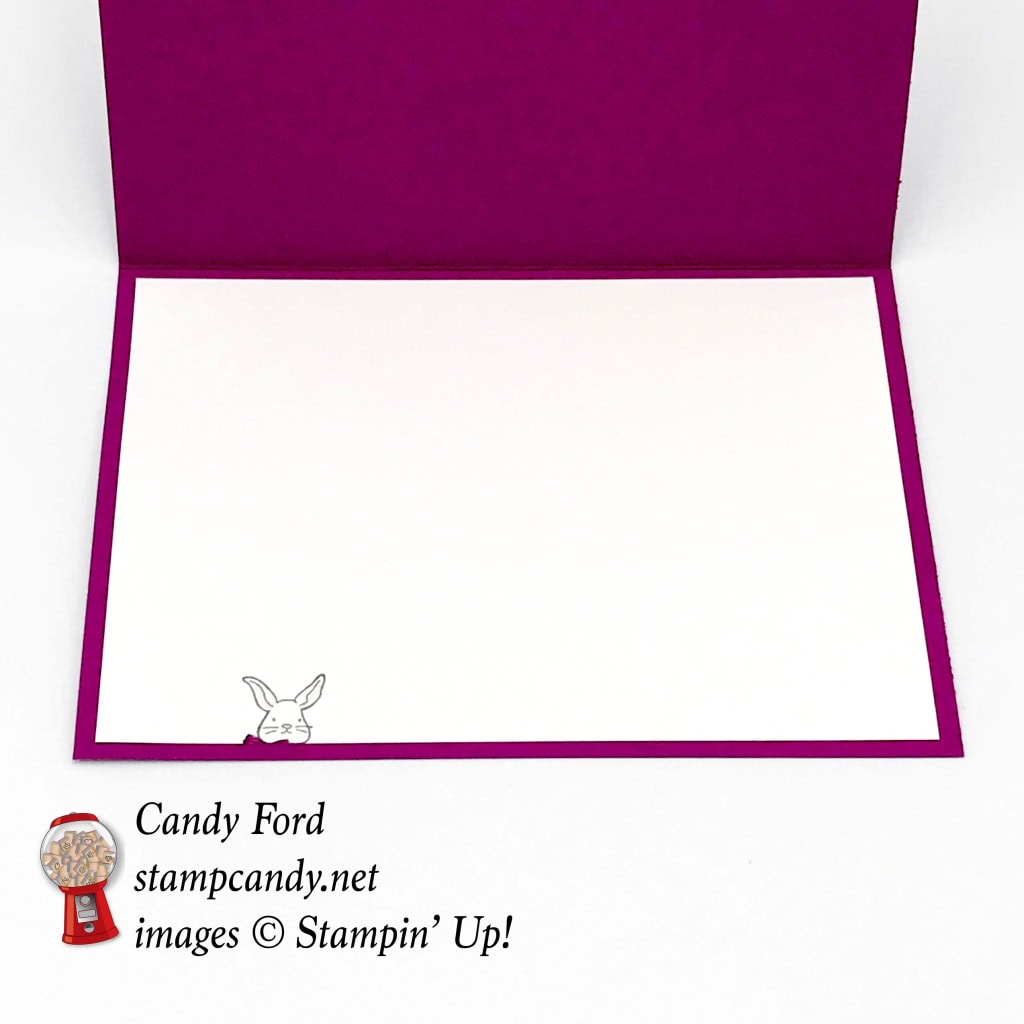
Here’s what I did:
Cut and scored with my Stampin’ Trimmer:
- Berry Burst card stock (CS) cut to 5-1/2″ x 8-1/2″, then scored in half at 4-1/2″
- Calypso Coral CS layer cut to 4-7/8″ x 3-7/8″
- Old Olive CS layer cut to 4-3/4″ x 3-1/4″
- Whisper White CS cut to 2-1/2″ x 1/2″ for the sentiment
- Whisper White CS cut to 5-1/4″ x 4″ for the inside
Stamped with the A Good Day stamp set:
- bunny in Basic Gray ink onto a scrap of Whisper White CS
- top part of bunny in Basic Gray ink onto the large piece of Whisper White CS
- sentiment in Berry Burst ink onto the Whisper White CS strip
Colored using Stampin’ Write Markers:
- bows of both bunnies in Berry Burst
- ears of both bunnies in Pink Pirouette
Cut using Scallop Circle Punches:
- bunny with the 1-1/8″ punch
- scrap of Old Olive CS with the 1-3/8″ punch
Assembled the card:
- folded the card base along the score line, and burnished it with a Bone Folder
- sentiment strip glued onto the 4″ x 3″ Memories & More (M&M) card
- bunny glued onto the Old Olive circle
- Old Olive circle adhered to the M&M card with Stampin’ Dimensionals
- M&M card glued onto Old Olive CS layer
- Old Olive CS layer glued onto Calypso Coral CS layer
- Calypso Coral CS layer glued onto the front of the card base
- Whisper White CS glued to the inside of the card base
Here are today’s colors:
You can click on each one to see all the products that come in that color!
Here’s what I used:
Click on these images for more details and to purchase.
Here’s some stuff you should know:
- This is a fabulous time to join my team! Sale-A-Bration is the biggest event of the Stampin’ Up! year and you can save big on the ultimate bundle, the Starter Kit. CLICK HERE for more information. Contact me with any questions: email candy@stampcandy.net or call/text 404-661-5222
- SAB Stamp Fest – ONLY 9 DAYS LEFT TO REGISTER! It happens January 20. Details and register HERE by January 13!
- Newsletter: subscribe for exclusive deals, projects, and more! Enter your email address and click SUBSCRIBE at the top right of this page, just under the picture of my smiling face. You can also choose to receive an email every day that I have a blog post.
- Check out My Events Calendar HERE
- Host Code for the month of January (XNNMNZSZ) Find out more about HOW, WHEN and WHY to use the code HERE.
- My Thank You Gift to You in January: Silver Embossing Paste – Find out more HERE.
- Gift Certificates are available in any U.S. dollar amount from me. Contact me – email: candy@stampcandy.net OR call/text: 404-661-5222
- Gumball Rewards for all orders over $50. Find out more HERE.
Thanks for stopping by today, and Sweet Stamping!
Jan 3, 2018 | Blog Hop, Cards, Gallery, New Products, Occasions, Sale-A-Bration |
This is the second card I’ve made using the Bubble Over Bundle – you can see the first one here. I really like these products. They’re fun and colorful and fit so many different occasions. The main reason I chose it for today’s card is because today is National Drinking Straw Day! So what could be more perfect than a card with drinking straws on it?

Bubble Over Bundle © Stampin’ Up!
Bubbles & Fizz Designer Series Paper © Stampin’ Up!

Since the 2018 Occasions and Sale-A-Bration Catalogs went live today, we at the Inspire Create Share Blog Hop thought it appropriate to showcase some of the new products. So today’s theme is A Recipe for Sale-A-Bration. We are featuring projects that use a Sale-A-Bration (SAB) product and other products that will get you up to the order you need to get it for FREE! My SAB product today is the Bubbles & Fizz Designer Series Paper (DSP) – yes, you can get this amazing DSP for FREE with a qualifying order.
When you scroll down and see what’s listed under Here’s What I Used, you’ll see more than just the main ingredients of the card. That’s because I like to show every single thing I used so you can purchase something if you don’t already have it.
Here’s how to get the Bubbles & Fizz DSP:
- Bubble Over Bundle $40.50, Whisper White Thick card stock $7.00, and Silver Foil Sheets $4.oo, totaling $51.50.
- Or you could use different card stock you already have, instead of the Silver Foil Sheet, and add a Bermuda Bay ink pad, totaling $54.00.
- Or how about this – Bubble Over Bundle $40.50, Whisper White Thick card stock $7.00, Silver Foil Sheets $4.oo, Cupcake Cutout Framelits Dies $27.00, Bermuda Bay & Calypso Coral ink pads 2 x $6.50, Stampin’ Dimensionals $4.00, Multipurpose Liquid Glue $4.00, throw in the Glitter & Clear Epoxy Shapes (Item#145632) that I used on yesterday’s card $7.00, totaling $106.50. With this order you can get the DSP plus another SAB item for free!
- I used the Cupcake Cutout Framelits Dies for the sentiment banner on today’s card, but if you don’t have them, you can just cut and score the paper with your Stampin’ Trimmer and notch the ends with either Paper Snips or the Banner Triple Punch (Item #138292, $$23.00.)
The thing is, for every $50 of goodies you get from your wish list, you get a FREE SAB item! And for every $100, you get either 2 FREE SAB items, or one of the two larger SAB items on pages 17 and 19. It’s a win win!
CLICK HERE for more details on Sale-A-Bration.
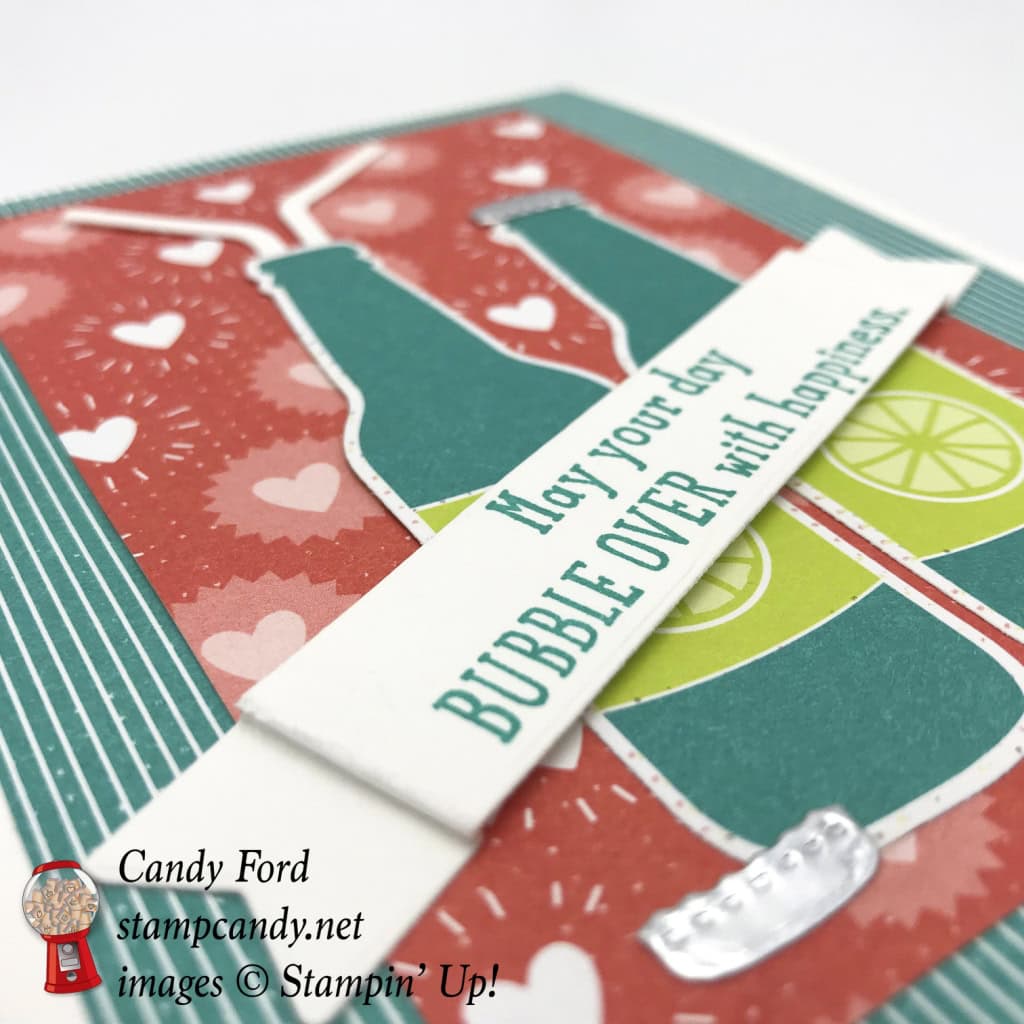
Here’s what I made:
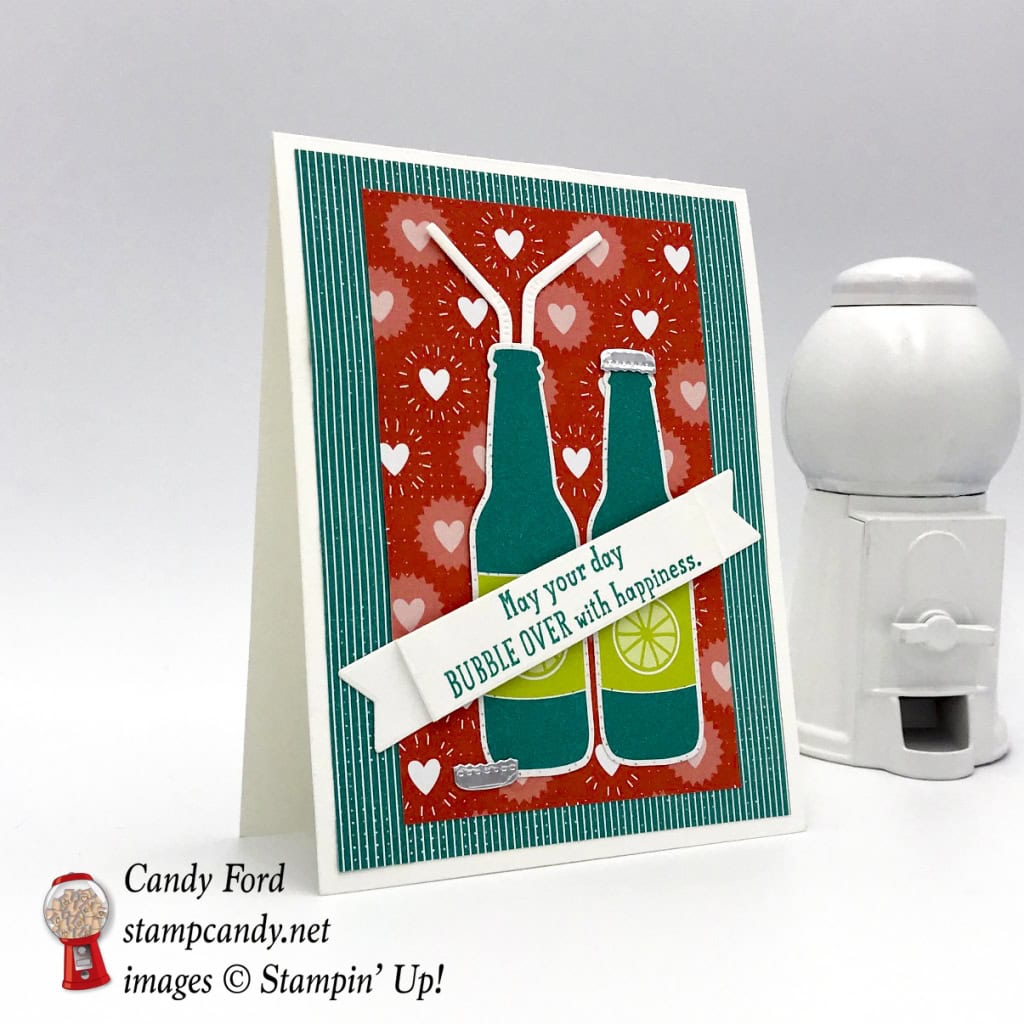
The bottles from yesterday’s card were stamped, but these bottles were cut directly from the DSP, saving a step – just one more reason to have the DSP!
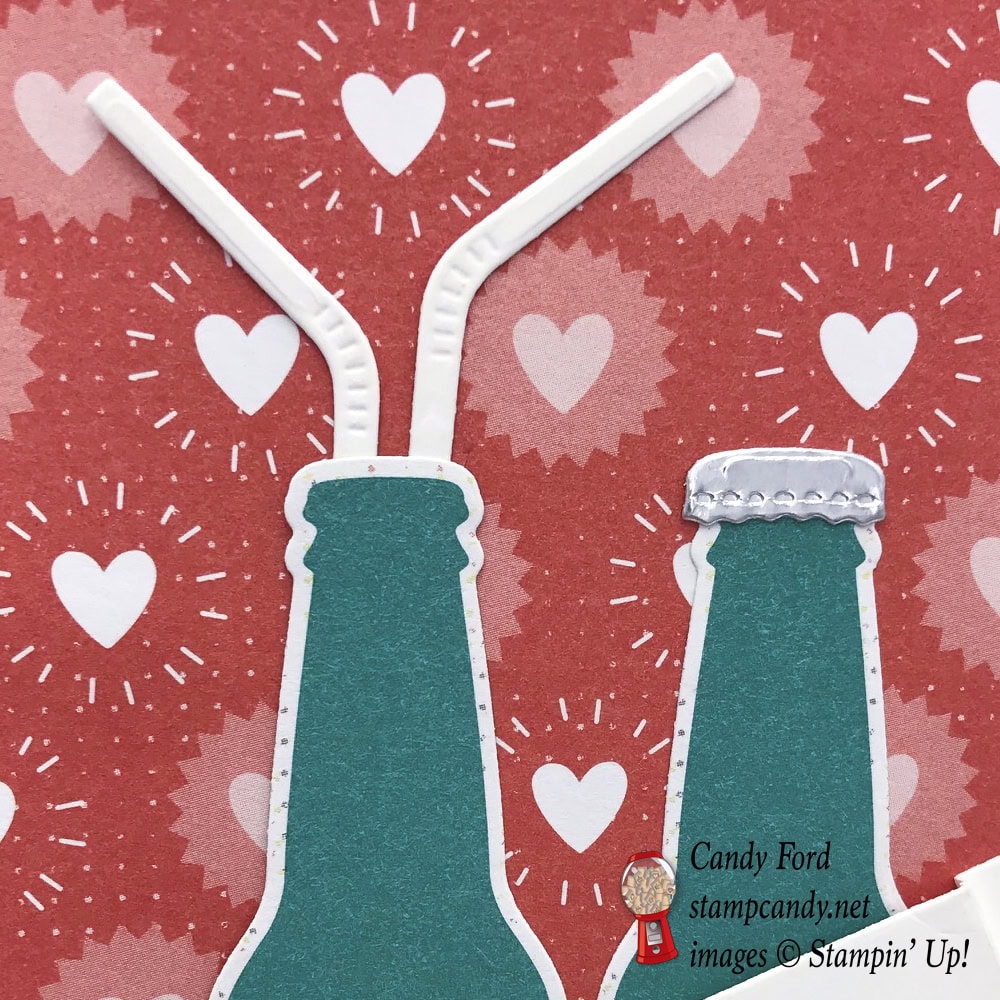
Here’s a close up of the drinking straws:
Here’s what I did:
Cut and scored with my Stampin’ Trimmer:
- Whisper White Thick card stock (CS) cut to 4-1/4″ x 11″, then scored in half at 5-1/2″
- Bubbles & Fizz Designer Series Paper (DSP) cut to 4″ x 5-1/4″ (blue layer)
- Bubbles & Fizz Designer Series Paper (DSP) cut to 3″ x 4-3/4″ (coral layer)
Stamped with the Bubble Over stamp set:
- sentiment in Bermuda Bay ink onto a scrap of Whisper White CS
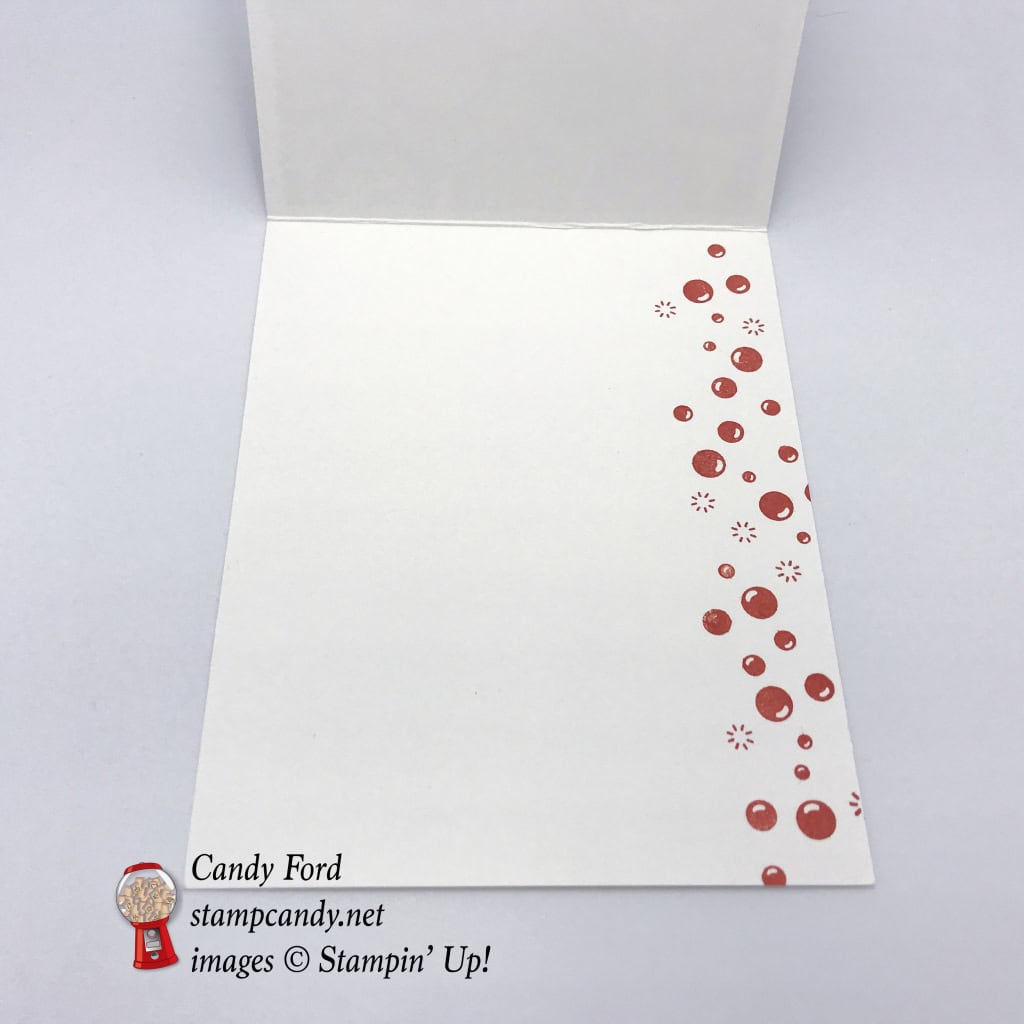
- bubbles in Calypso Coral ink onto the inside of the card base
Die cut using the Bottles & Bubbles Framelits:
- straws (2) from a scrap of Whisper White Thick CS
- bottle caps (2) from a Silver Foil Sheet
- bottles (2) from a third pattern of the DSP
Die cut using the Cupcake Cutouts Framelits:
Assembled the card:
- burnished the card base score line, and the score lines in the sentiment banner, with a Bone Folder
- the 2 straws glued onto the back of one of the bottles
- the 2 bottles glued onto the coral DSP layer
- one bottle cap glued onto the top of a bottle
- the other bottle cap glued to the coral DSP layer at the bottom of the other bottle
- coral DSP layer glued to the blue DSP layer
- blue DSP layer glued to the front of the card base
- adhered sentiment banner with Stampin’ Dimensionals in the center and glue on the ends
Here’s the Next Stop on the Hop:
Click the arrow to hop to the next stop, Joni Metras of Joni in the Spotlight Stamping:
Here are today’s colors:
Click on each one to see everything that comes in, or with, that color!
Here’s what I used:
Click on the images for more details and to purchase.
Here’s some stuff you should know:
- This is a fabulous time to join my team! Sale-A-Bration is the biggest event of the Stampin’ Up! year and you can save big on the ultimate bundle, the Starter Kit. CLICK HERE for more information. Contact me with any questions: email candy@stampcandy.net or call/text 404-661-5222
- SAB Stamp Fest – ONLY 10 DAYS LEFT TO REGISTER! It happens January 20. Details and register HERE by January 13!
- Newsletter: subscribe for exclusive deals, projects, and more! Enter your email address and click SUBSCRIBE at the top right of this page, just under the picture of my smiling face. You can also choose to receive an email every day that I have a blog post.
- Check out My Events Calendar HERE
- Host Code for the month of January (XNNMNZSZ) Find out more about HOW, WHEN and WHY to use the code HERE.
- My Thank You Gift to You in January: Silver Embossing Paste – Find out more HERE.
- Gift Certificates are available in any U.S. dollar amount from me. Contact me – email: candy@stampcandy.net OR call/text: 404-661-5222
- Gumball Rewards for all orders over $50. Find out more HERE.
Thanks for stopping by today, and Sweet Stamping!
